Agent Status — Active Versus Available
Agents can have statuses that reflect two (2) things: their activity and their availability.
An "Active" agent is one who is able and ready to participate in tickets, live chats, take phone calls/create call logs, etc. When they're "Inactive", then, they're essentially away for an extended period of time: they're gone for the day because their shift has ended, they're on vacation, etc. When an agent is "inactive", they don't receive any new tickets, they won't receive any ticket replies, etc. Any tickets they were working on that were in a Waiting status will be moved to an Active agent if a reply comes in, etc. (When Round Robin is being used for ticket distribution.) Any tickets they have in an active state stay with them.
Conversely, there's the agent's "available" status: they're either Available or Unavailable. Availability generally only affects the agent's ability to participate in Live Chat: if they're unavailable they won't receive any new live chats via Round Robin, though they can pull chats from the queue. It DOES NOT affect their ability to receive new tickets. Therefore, availability can be thought of as an "Away From Keyboard" or AFK status. So if an agent goes to lunch, takes a break, etc. and will be away for a short period of time they'll generally just mark themselves as "Unavailable" versus making themselves inactive in a group.
My Groups
Tickets, live chats, and calls from the SmarterTrack Communicator are distributed amongst a group based on the agent(s) of that group who have an Active status. In order for a ticket or live chat to be automatically assigned to an agent or for a VoIP call to make it to an agent's SmarterTrack Communicator, the agent must be logged into SmarterTrack and their Active Group status must be set to receive tickets, live chats and/or VoIP calls for the corresponding group. If all agents are either logged out or are not receiving tickets, live chats and/or calls through SmarterTrack Communicator, the ticket or live chat will be directed to the Queue and phone calls will be handled based on the ruleset created inside the phone server. For this reason, it is imperative that agents check their Active Group status upon logging in or prior to logging out and ensure they are active in the groups they are going to be working in.
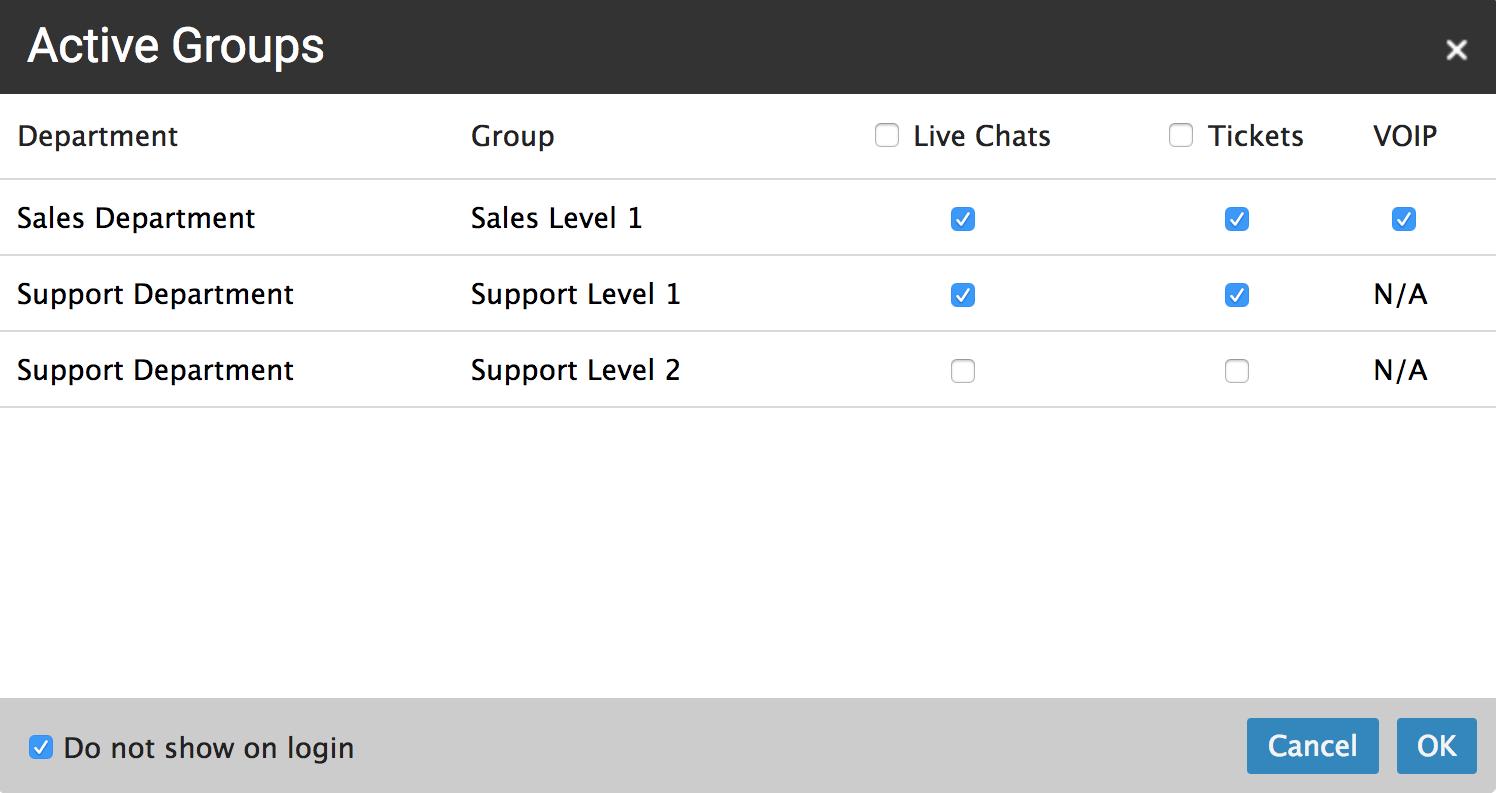
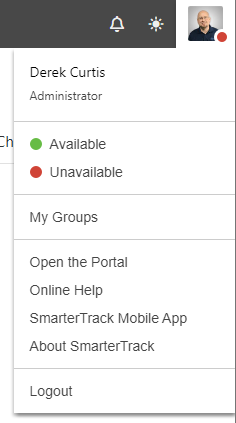
The My Groups popup gives agents the ability to quickly view all of the groups they belong to and start or stop activity for live chats, tickets and VoIP calls. To help make this process simple and automatic, the Active Groups popup displays in the management interface upon login. It can also be accessed at any time by clicking on the agent avatar in the upper right corner of the interface and clicking My Groups from the dropdown.

The My Groups modal will display a list of all groups the agent is a member of. If an agent is part of a group but excluded from a particular communication method, "N/A" will appear next to the group name instead of a checkbox. The following columns will be available:
- Department - The name of the department, such as Sales, Support, or Billing.
- Group - The name of the group, such as Sales Front Line or Billing Escalation.
- Live Chats - Active Groups are used to determine the distribution method to use for live chats.
- Tickets - Active Groups are used to determine the distribution method to use for tickets.
- VOIP - Active Groups are used to determine the distribution of calls for agents using SmarterTrack Communicator. If an agent is using SmarterTrack Communicator and a VoIP account is set up and enabled for a group, this column will have a checkbox. The ruleset created inside the phone server determines the call distribution when all agents are unavailable.
Changing the Active Status of an Agent
An agent can go Active or Inactive in groups on their own, or a manager or system administrator can make an agent Active or Inactive.
As an agent, follow these steps to go Active or Inactive in a group:
- Log in to SmarterTrack using your agent credentials.
- Generally, when an agent logs in the My Groups modal will automatically display.
Note: The My Group modal can also be accessed at any time by clicking the agent avatar image or monogram in the upper, right corner of the management interface and selecting My Groups from the dropdown.
- Find the Live Chats column. If live chats are enabled for a group, this column will have a checkbox available. Otherwise,"N/A" will be displayed. In order to start receiving chats for a particular group, check the appropriate checkbox next to the group's name. To stop receiving chats for a particular group, uncheck the appropriate live chats checkbox.
- Find the Tickets column. If tickets are enabled for a group, this column will have a checkbox available. Otherwise, "N/A" will be displayed. To start receiving tickets for a particular group, check the appropriate checkbox next to the group's name. To stop receiving tickets for a particular group, uncheck the appropriate tickets checkbox.
- Follow these same steps for the VOIP column.
Important: VoIP operations require the integration of the SmarterTrack Communicator.
- Click OK.
As a manager or system administrator, you can make an agent Active or Inactive as needed. For example, if your agents don't log out of SmarterTrack at the end of a shift, but an agent calls in sick, you can make that agent Inactive in all of their groups so that they don't receive any new tickets. To modify an agent's Active Groups, do the following:
- Log in to SmarterTrack using your manager or system administrator credentials.
- Select Active Agents from the navigation menu.
- Select By Agent from the view options in the navigation menu.
- Find the agent's name in the list. Select the agent and click the Edit button. The active groups modal opens for that agent. (Alternatively, you can double-click on the agent's name to open the active groups modal.)
- To make the agent inactive in a group, you can uncheck the boxes next to each group name for that agent in the Live Chats, Tickets and VOIP columns. Alternatively, you can simply check, then uncheck the box next to each column name to make the agent inactive in all of their groups.
- To make an agent Active in a particular group, simply check the box next to the group name. (Again, to make an agent Active in all groups, check the box next to the column name(s).)
- Click OK.
Available/Unavailable
To temporarily stop receiving new live chats in all groups, click on your agent avatar in the upper right corner and select Unavailable. New live chats will not be assigned to you; however, you will keep possession of any existing live chats. In addition, you will still receive tickets based on the distribution method for the various groups you're part of.
To begin receiving new live chats again, select Available from the dropdown.

You'll notice Available/Unavailable is designated by a color scheme so you can tell your availability simply by looking at your avatar and checking the color of the dot that sits on top of it.