SmarterMail Online Meetings
SmarterMail's Online Meetings feature offers seamless audio and video conferencing for up to 9 participants, extendable to 16 with an external STUN/TURN server, and unlimited text chat participants. Built on the WebRTC framework, it ensures efficient bandwidth usage and high-quality communication. Users can share entire screens, specific applications, or individual browser tabs, enhancing collaboration. File sharing is integrated, with uploaded files stored in SmarterMail's File Storage for easy retrieval. Meeting organizers have full control over settings, including guest access and permissions, making Online Meetings a better alternative to third-party conferencing solutions such as Zoom or Microsoft Teams.
| This feature is only available in SmarterMail Enterprise. |
Jump to:
- Creating an Online Meeting
- Online Meetings and Calendar Invites
- Online Meetings Video Chat
- Virtual Background Images
- Screen Sharing
- Online Meeting File Uploads
- Uploading and Sharing Files
Creating an Online Meeting
When creating a new online meeting you'll be presented with this:
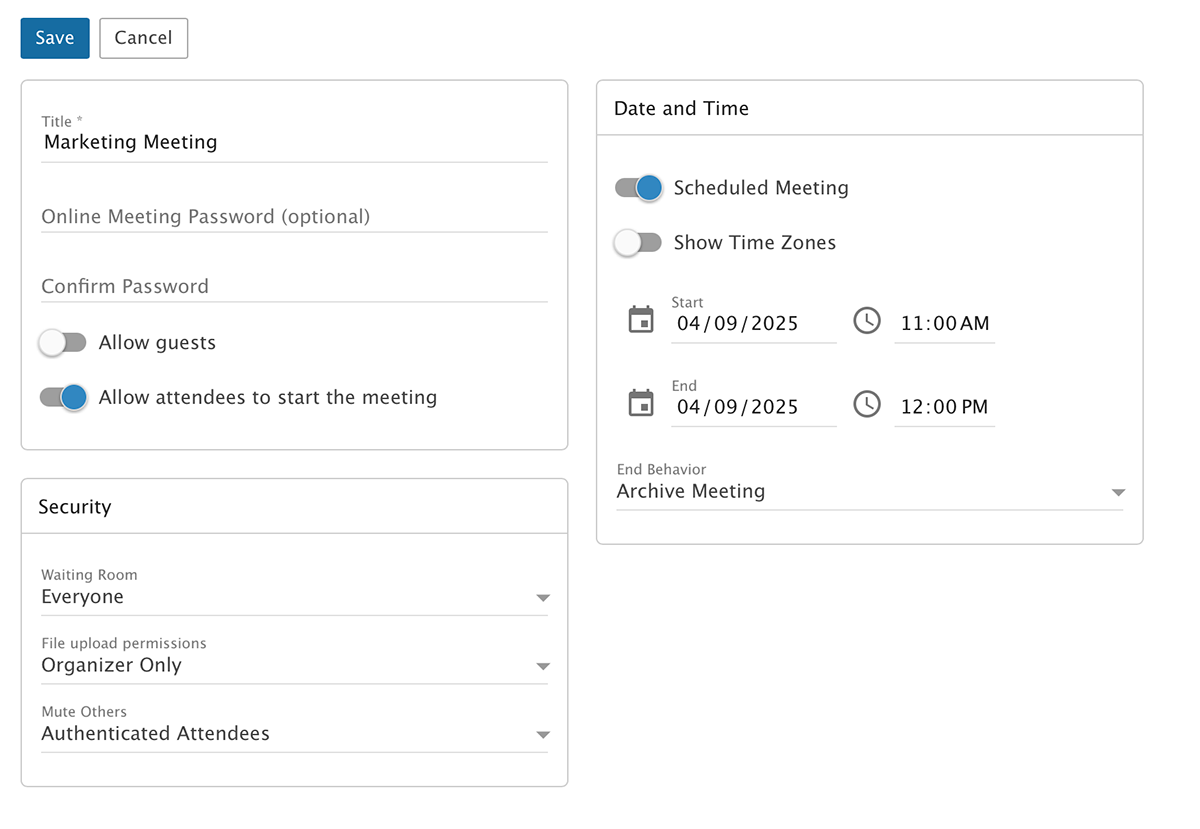
Title your meeting and you're ready to get started as the meeting's title is all that is actually required to save the meeting. However, there are a few other settings you can add on the creation screen: you can add a password and/or you can schedule the online meeting so that it will be used on a regular basis. Once you click the Save button, you can either stop there or open the meeting and further customize your settings.
Complete Settings
After you create your meeting, you can open it and modify its settings. As an aside, you can edit these settings at any time by clicking on the Settings (gear) icon whenever you open your meeting. Below is what the settings page looks like:
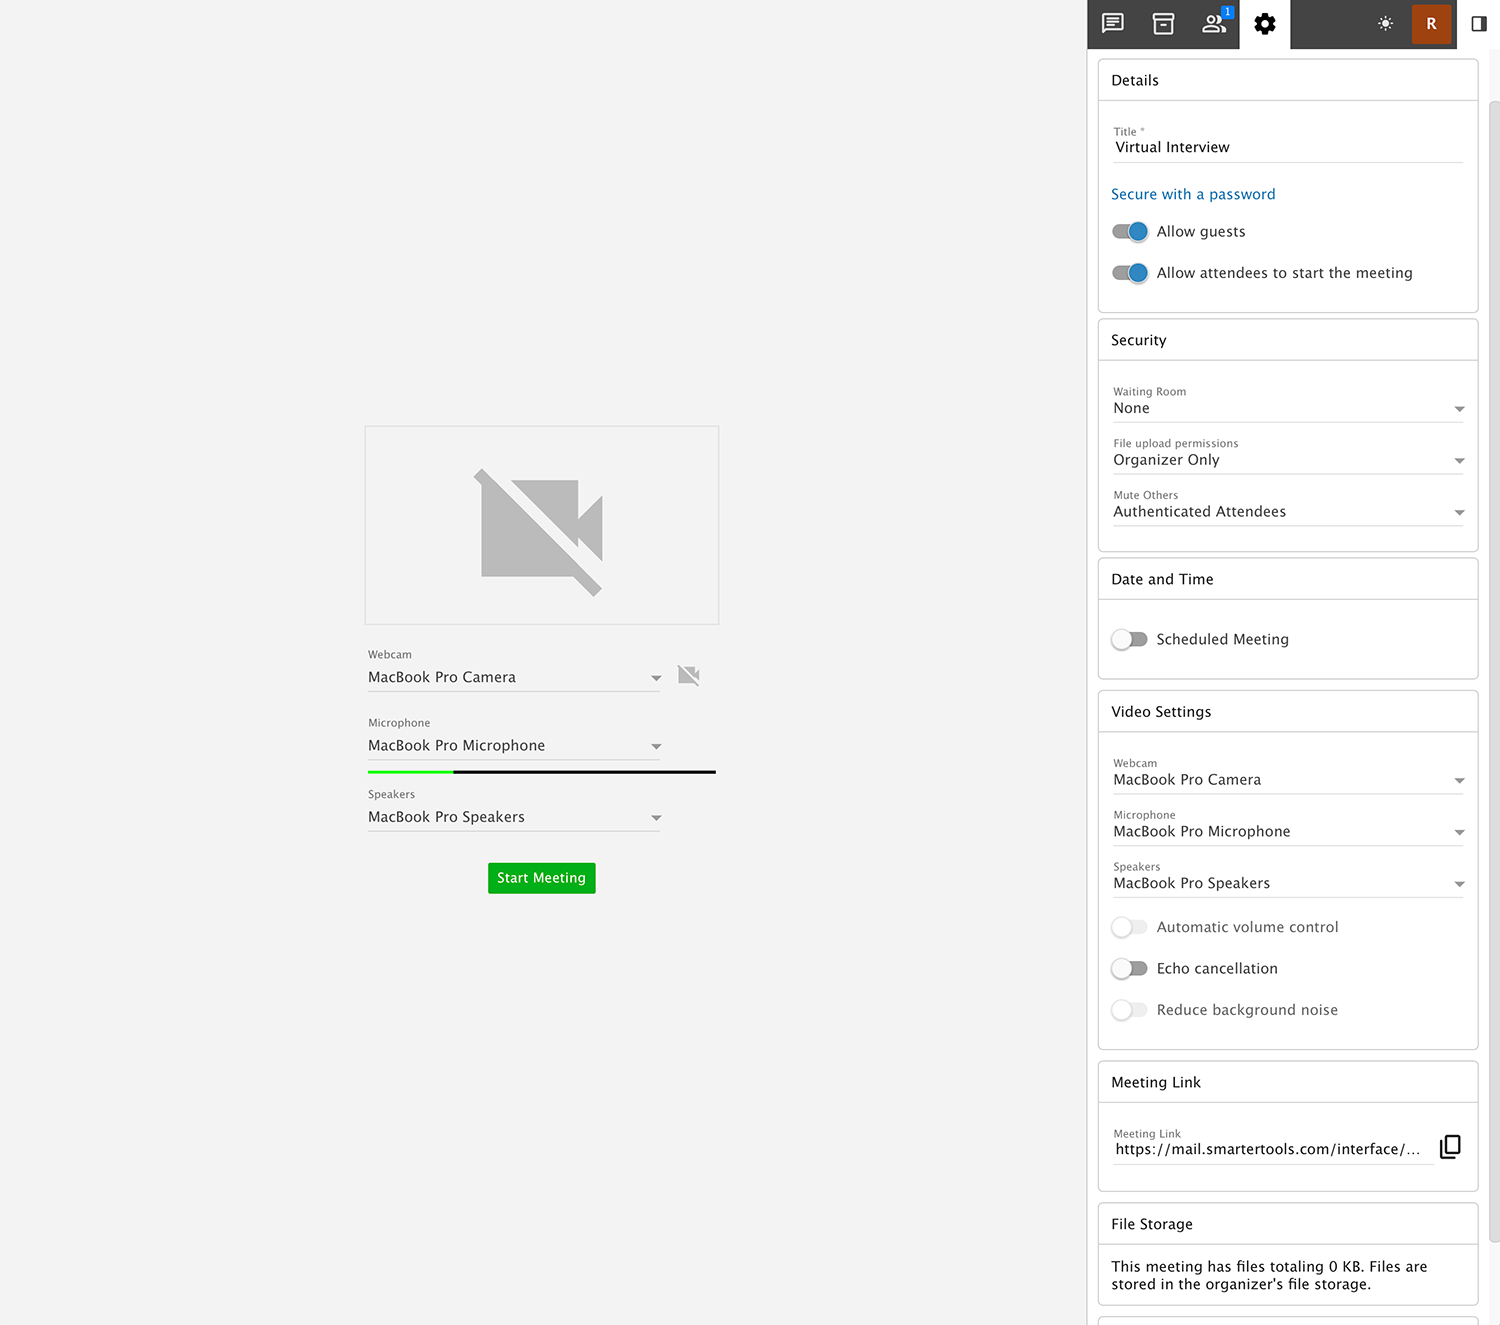
Just as with other areas of SmarterMail, the settings for an online meeting include various cards for categorization. The cards, and their respective settings, include:
Details
- Title - This will be whatever you called the online meeting when it was initially set up, but you can change it at any time.
- Secure with a password - If you want to lock access to the meeting with a password, that's not a problem. Simply set the password here to whatever you want. When sending out the invitation, however, be sure to let your participants know the password or they won't be able to join.
- Allow guest users - Don't want to force your attendees to log in? No problem! Just enable "Allow guest users" and anyone with the link can attend the meeting, no log in required.
- Allow attendees to start the meeting - Enabled by default, this means attendees can start the meeting without the Organizer to be present.
Security
- Waiting Room - Waiting rooms allow organizers to specify which attendees should wait to be admitted into an Online Meeting. No one, Guests, or Everyone can be subject to waiting. When a new attendee "joins", a modal appears announcing they're waiting to be admitted into the meeting.
-
File upload permissions - Each meeting has the ability to allow users to upload files. However, the
meeting organizer can set file upload permissions so that only the organizer has upload permissions, people who
are authenticated users can upload files, or anyone can upload.
Note: It IS possible to restrict the file extensions that are able to be uploaded to an online meeting. However, the File Storage Extension Blacklist is set by the system administrator.
- Mute Others - Organizers can pick which type of attendee has the ability to mute other Online Meeting participants. While users may be allowed to mute other participants, they do not have the ability to un-mute participants. They must un-mute themselves.
Date and Time
-
Scheduled Meeting - Toggle Scheduled Meeting if you want to continue using the same online meeting on a
regular basis. This is similar to creating recurring Calendar appointments where you set the state date and time
as well as the ending date and time.
Note: When an Online Meeting is created as part of a standard SmarterMail Calendar appointment, these will be set to mirror the date(s) and time(s) associated with the Appointment.
- End Behavior - At the end of the scheduled recurrence, you have options to Archive Meeting, which ends the schedule but keeps the meeting in your list, Delete Meeting, or Keep Active.
Video Settings
- Webcam - This is the stream quality for your online meeting. Video can take up a lot of bandwidth, so keeping this set to Low is a "best practice" if at all possible.
- Microphone - This allows you to set the default microphone you use during the meeting. This will generally default to whichever default input device is set for your computer, but you can change it to headphones, an attached USB mic or any other input device you have set up.
- Speakers - Just as with the microphone setting, this is the audio output for the meeting. Again, this will generally default to whichever default output device is set up for your computer, but you can change it to whatever.
Several advanced audio controls are also available:
- Automatic volume controls - Enabling this allows SmarterMail to automatically handle increasing or decreasing the volume of the meeting.
- Echo cancellation - Enabling this allows SmarterMail to automatically handle echo management.
- Reduce background noise - Enabling this allows SmarterMail to automatically handle reducing any background noise that may be picked up by the microphone selected.
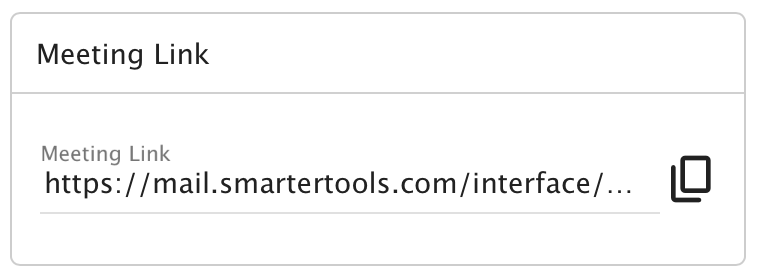
Meeting Link
- Meeting Link - This is the link to the meeting that can be shared with whoever you want to attend. You can select the text and copy it, or use the copy icon.
File Storage
This section will initially be empty. However, as you use the meeting, it will keep track of the number of files shared in the meeting and the space taken up by those files.
Chat
While chat is a great feature of online meetings, it may be necessary to delete the chat. For example, if the same meeting is used on a weekly or monthly basis for a meeting, you may want to delete the live chats after whatever information in the chat was transcribed to a separate document, once tasks have been created from action items, etc. This area allows you to delete all of the live chats that have occurred during the meeting.
Once you have all your settings in place, be sure to save them. As an aside, if you need to change a setting, like allowing guests to upload images, you can change that during the meeting and the setting takes effect immediately.
Online Meetings and Calendar Invites
When creating a meeting invitation in your calendar, you have the option to "Create Online Meeting". This setting allows organizers to have a new online meeting created, automatically, to be used for the appointment that's being set up. The meeting will use the appointment's Subject as its name and will appear in the Online Meetings area. In addition, a link to the meeting is sent with the meeting invitation to all attendees. By default, meetings are initially created to allow for guest users, do not have passwords assigned, and are set so that only the Organizer can upload files. Therefore, if any of these settings need to be changed, they'll need to be changed prior to the meeting date/time, and any changes manually sent to the attendees.
Access Previous Meetings
Any meeting room you create are saved as a separate cards. That means you can access, and re-access, any past meetings. While the video isn't saved, any live chats and shared documents ARE saved, allowing you to refer back to those at a later date whenever needed.
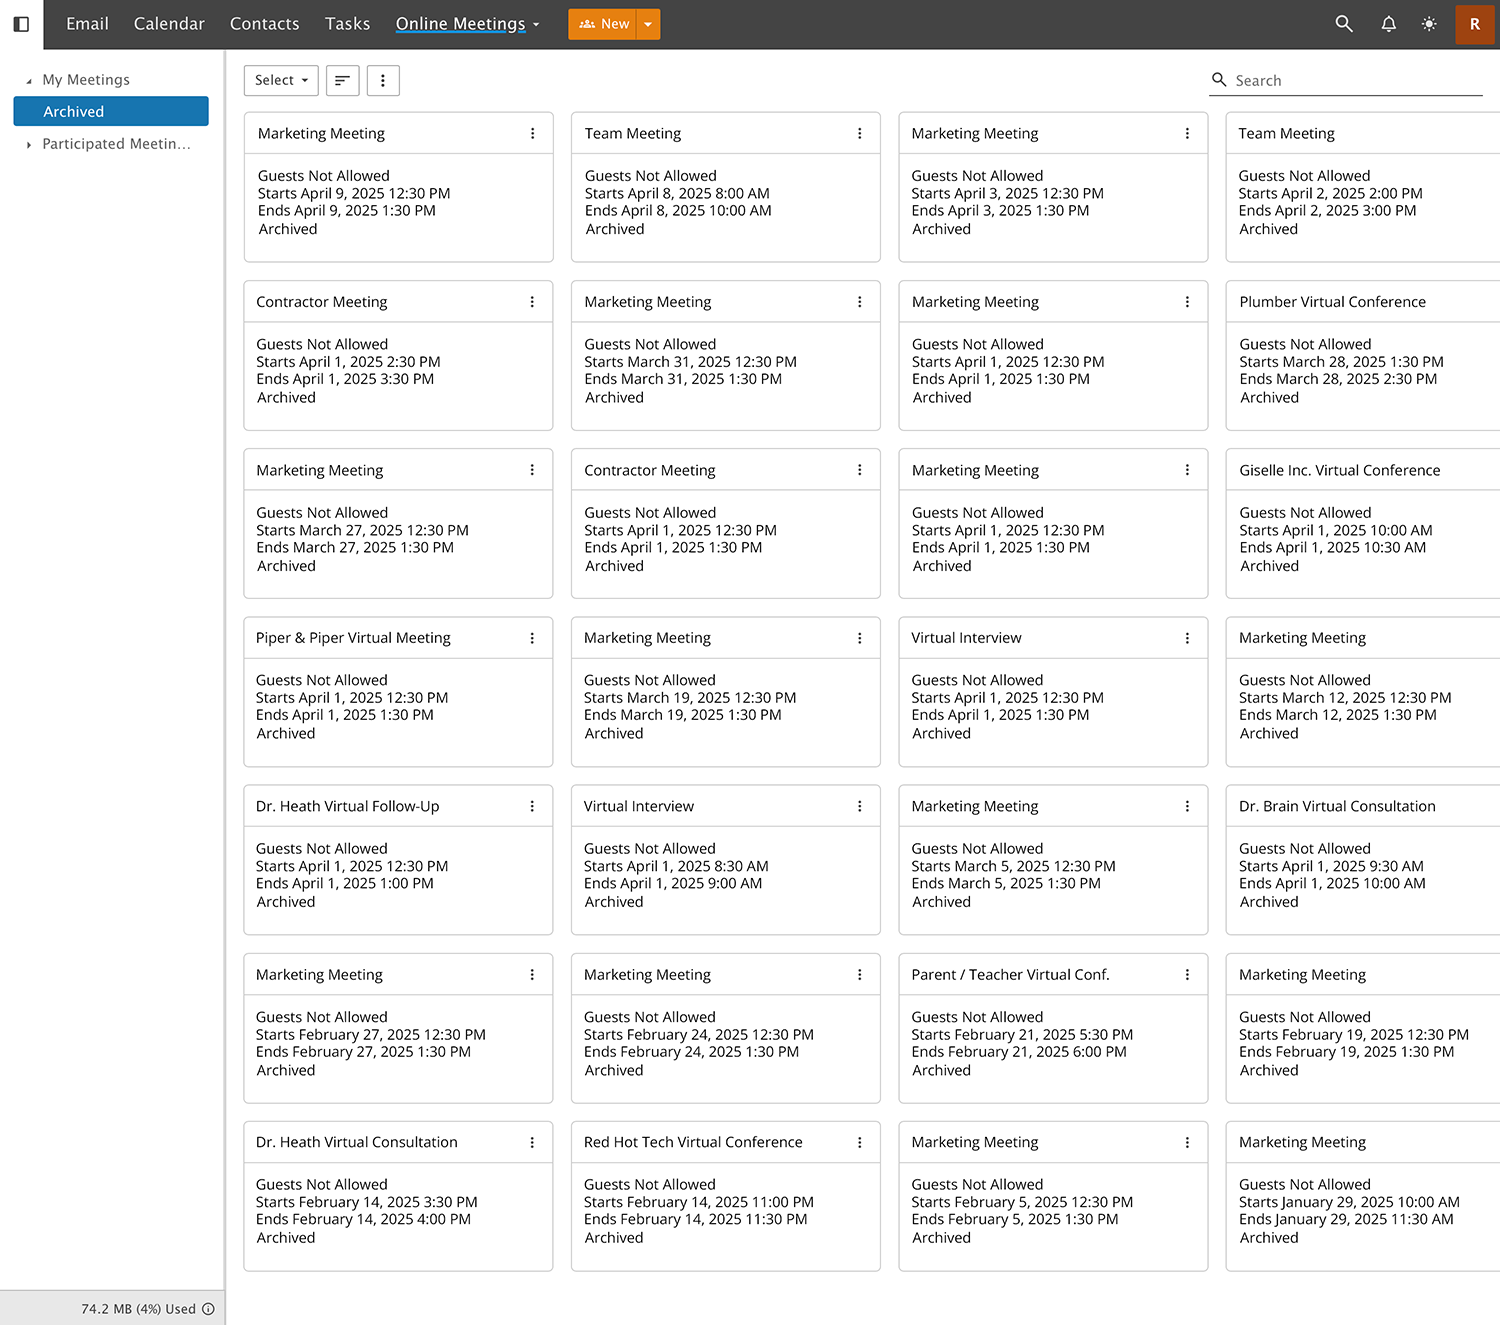
Participated Meetings
Not only are the meetings that YOU create listed, so are meetings that you've been invited to. To access these, simply click on the Participated Meetings option from the left navigation pane. Here, meetings that you've participated in are listed as separate cards. While you won't be able to edit any information on these cards, you do have the ability to revisit the meetings, see chats, re-login to the video chat and more.
Sharing Online Meeting URLs
The URL for an online meeting can be accessed in two locations:
- Using the Actions (⋮) menu on a meeting's card — simply click on the menu and select Copy Link from the dropdown. Online meeting can be deleted from this location as well.
- By opening the actual meeting and copying the URL from its settings.
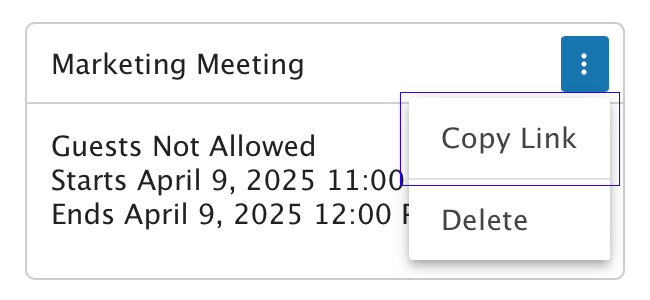
The first method is, by far, faster and more convenient. It allows you to quickly grab a URL and share it in a live chat, in an email or when creating a single or recurring appointment.
Online Meetings
| This feature is only available in SmarterMail Enterprise. |
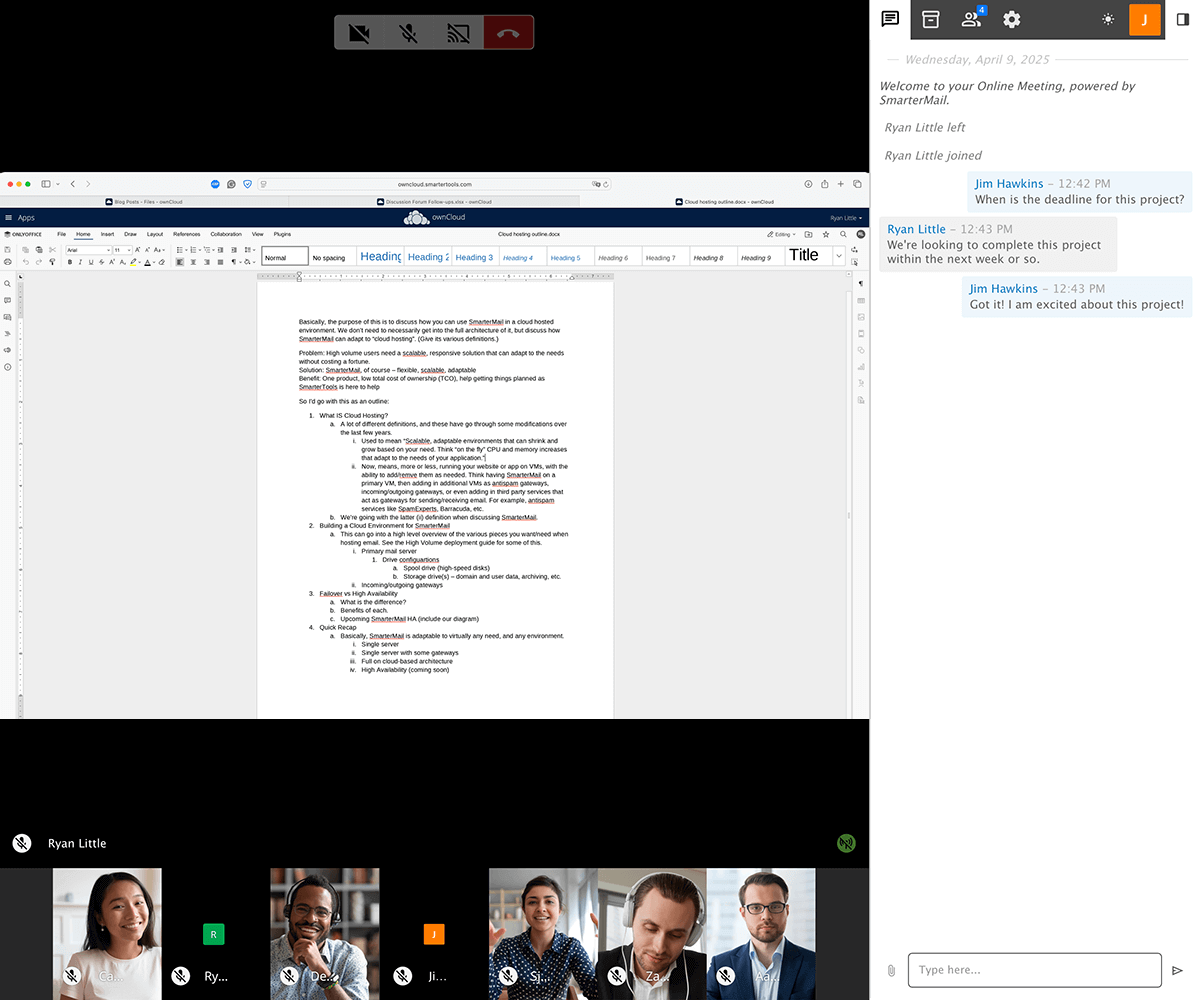
With Online Meetings, you can have real-time audio and/or video chat with up to 9 participants at the same time. In addition, each participant has complete control over their interaction — that is, they can manage the microphone and speakers that are used. Participants can also mute others, so if someone is in a noisy environment and they forget to mute their microphone, each participant can mute that person themselves.
Starting an Online Meeting
When accessing an online meeting, you're initially presented with a live feed of your webcam, as well as the options to change the camera and/or the microphone used for the audio portion of the meeting. You can use this page to modify those settings and, if necessary, troubleshoot any issues. (e.g., ensuring your browser window has the proper permissions for accessing your camera.)
Once you're ready, simply click the Join Meeting button.
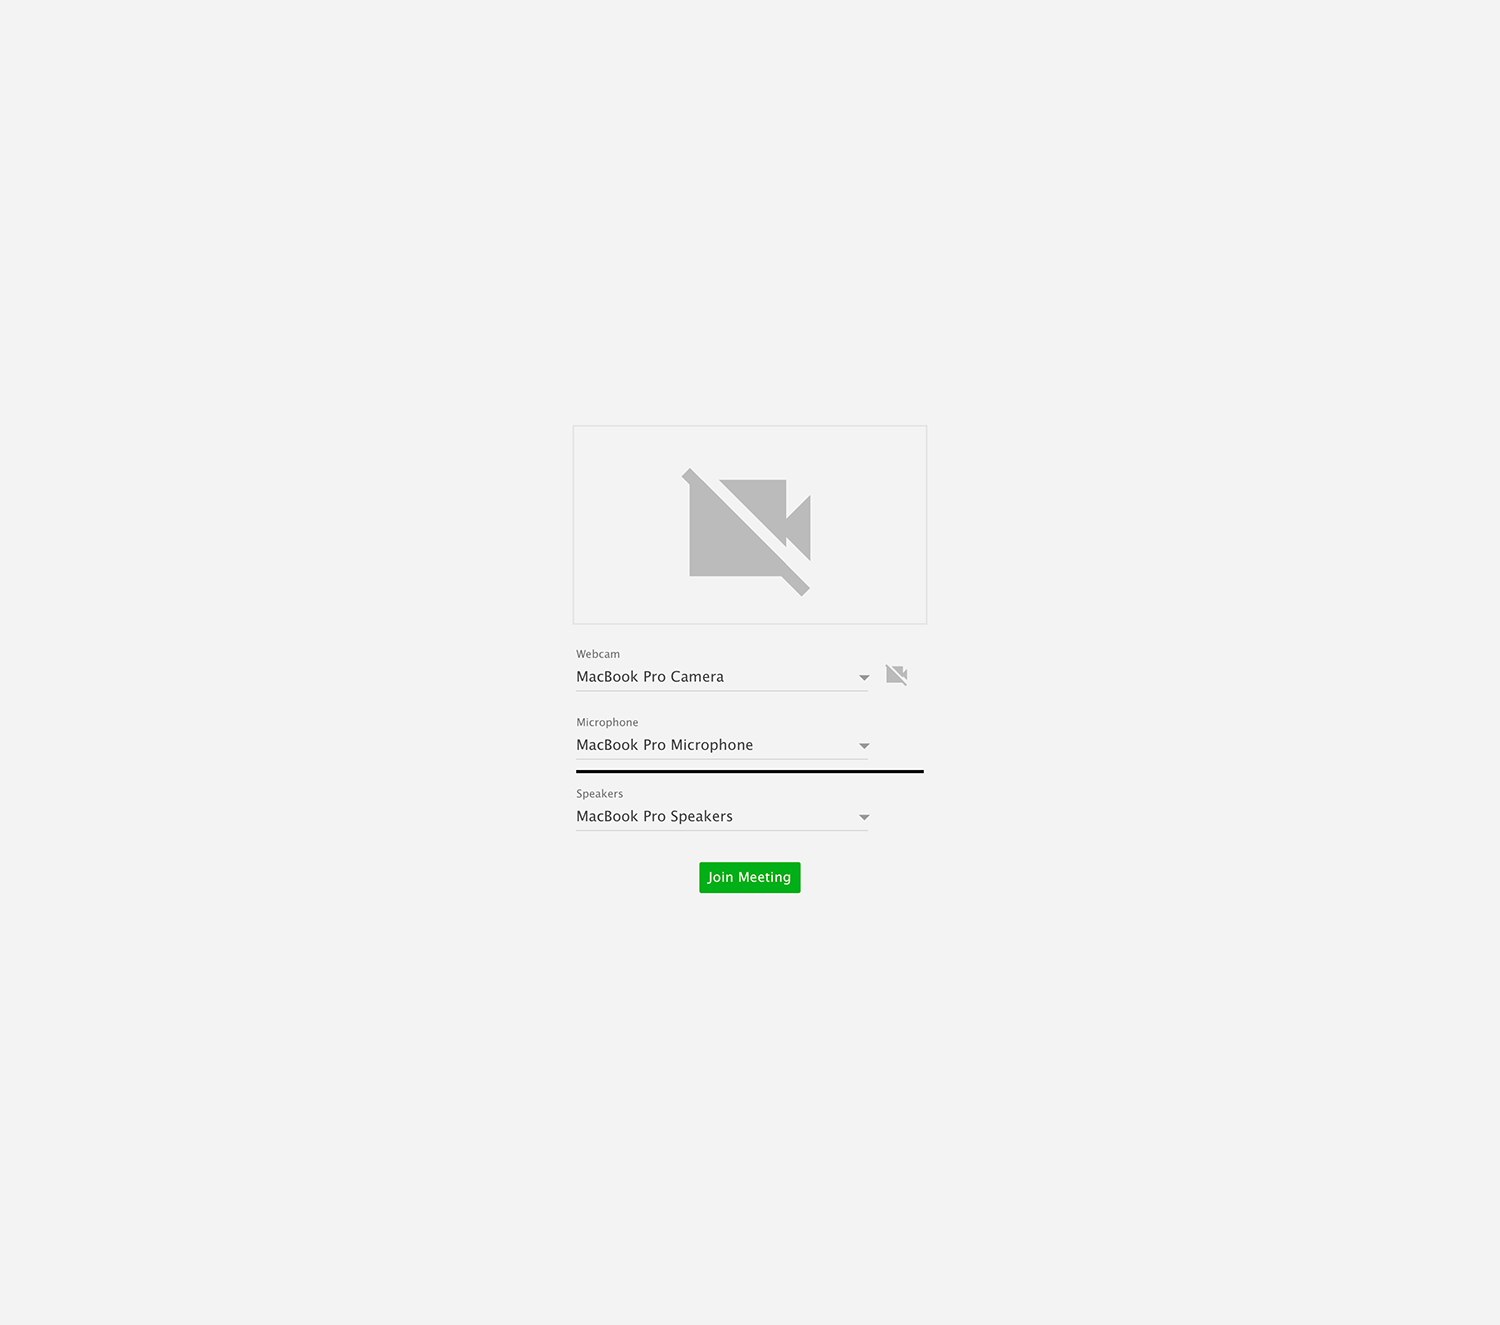
Once you enter the room, you'll see your own audio/video feed as well as the video feed of other participants. As more people join their feeds will also display. If someone turns off their camera, you'll see a blank box with a monogram in the middle of the box, so you know who that's supposed to be.
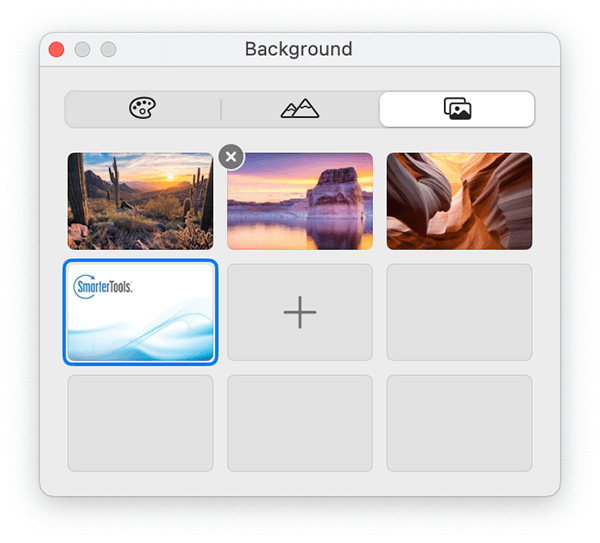
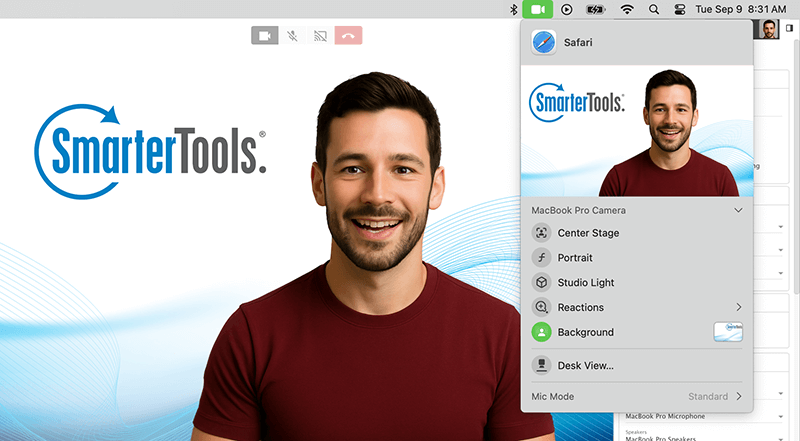
Virtual Background Images
SmarterMail Online Meetings supports custom background images, giving users the ability to personalize their video feed. To enable this feature, select and add a JPG or PNG file from the operating system’s menu, taskbar, or system tray. For the best results, use an image with a 16:9 aspect ratio.
Adding a Custom Background (macOS)
- Join or start Online Meeting.
- Click the Camera/Video icon
 located in the top menu bar on macOS.
- Under Background, click on the video display thumbnail.
- The Background window will appear, where you can choose an existing background image or click the + icon to add and upload a custom background image.
- Select a JPG or PNG file (recommended size: 1600x900 pixels).
- Close the settings panel. Your video feed will now display with the selected background.
Custom Video Backgrounds on Windows
Unlike macOS, which provides system-level controls for webcam effects, Windows does not include built-in global settings for managing custom video backgrounds, as web browsers only provide access to your camera feed. The ability to change backgrounds depends on third-party applications (such as Zoom or Microsoft Teams), not the browser itself.
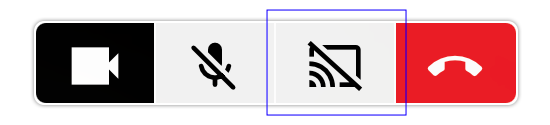
Screen Sharing
From training sessions to document collaboration, screen sharing makes online meetings even more helpful and productive, enhancing the ability for people to communicate and work together. With screen sharing, users are able to share the following:
- Your Entire Screen - Users can opt to share their entire screen, regardless of how many applications are open. This allows them to switch between applications during a meeting. When they have multiple monitors, they can even select which monitor they want to share.
- Application Windows - If multiple applications are open, rather than share an entire screen, specific applications can be shared. This makes it easy to collaborate on office documents, troubleshoot code, review marketing material and more.
- Specific Browser Tabs - Just as with applications, it's also possible to share a specific browser tab. So, you're online meeting can be running in one tab while a separate one that is open to a website, online application, calendar or more can be shared and worked on as a group.
To start sharing your screen during a meeting:
- In the toolbar at the top of the video chat, click on the Sharing icon.
- Select the item/screen you want to share: an entire screen, an application or a browser tab.
- When you share your screen, you’ll be taken to that window so you can interact with it. A light blue outline shows what’s being shared. You can switch back to the meeting at any time, your shared screen will remain the main focus, displayed as the largest window at the top of the meeting.
- When you’re finished, click the Sharing button again to stop. You may also see a notification while sharing, use that to end the share as well.
Video Settings
Participants have some control over the audio and video settings that are used. To modify those settings, simply click on the Settings icon. On the Video Settings card you'll be able to set:
- Webcam - You can set your video quality from High to Very Low. In cases where a participant is on a poor internet connection, or even using a cellular connection, the Low or Very Low settings may be preferred to help reduce bandwidth.
- Microphone - The meeting will select a default microphone for you. However, if you want to change it to a headset mic or something else, you can do that here.
- Speakers - The default speaker set should be used by default, but if an external source is desired, it can be selected from the dropdown.
- Automatic volume controls - Enabling this allows SmarterMail to automatically handle increasing or decreasing the volume of the meeting.
- Echo cancellation - Enabling this allows SmarterMail to automatically handle echo managment.
- Reduce background noise - Enabling this allows SmarterMail to automatically handle reducing any background noise that may be picked up by the microphone selected.
Troubleshooting and Status Indicators
From time to time, issues may arise when connecting to an online meeting. Common issues seen are an attendee seeing having a black video screen and below are a few troubleshooting steps for attendees who are experiencing issues:
- First, and arguably the simplest, is to make sure the attendee has turned on their microphone and camera once they join. By default, both are turned off for attendees.
- It's possible that the attendee's browser is blocking their microphone and/or their video camera. Have the attendees double-check their browser settings to ensure the browser is allowing the use of the camera and/or microphone.
- Pop up blockers and/or ad blockers can interfere with browser-based audio and video chat. Have the attendee add an exception to their ad blockers for your email domain, or at least temporarily allow the connection.
- If they're using any security software, such as Eset or Malwarebytes, these may need to be checked so that access to the camera and microphone aren't being blocked.
- If they have "turned on" both their mic and camera, but you still see a black screen for them, have them leave the meeting, then rejoin. (Simply turning the video off, then back on may work as well.) The majority of the time this will re-negotiate the connection to the meeting and clear up the issue.
- If possible, have the attendee clear their browser cache. This is useful if they've attended previous online meetings and a recent update was applied to the SmarterMail server.
- Of course, network issues — either on the organizer's end or the attendee's end — will cause problems. Most times, having the attendee turn off their video and simply use voice communication can stabilize a connection.
- Finally, online meetings DO require the use of SSL. If your mail domain isn't secured with an SSL certificate, this will cause problems.
Sometimes, you might run into issues when joining an online meeting, like seeing a red, green or orange connection icon next to an attendee's video.
- Red: This indicates "High RTT" or round-trip time. Think of this in terms of "ping" time: the higher the number, the longer it takes for a response to a request to get back to you. This can be seen by experiencing lag in voice or video displays and is generally a consistent issue.
- Green: This indicates high "jitter". Jitter essentially means that the signal is inconsistent: the signal is strong some times, weak at others. So it's a bit different than high RTT as it's not consistent.
- Orange: This indicates issues with frame rate. This can be seen by a degradation in video quality. However, even if you see this icon, you may not notice any issues as the variance my not be discernible.
Online Meeting File Uploads
| This feature is only available in SmarterMail Enterprise. |
Part of having a collaborative meeting is the ability to upload and share files. The online meeting organizer has the ability to set the file upload permissions for the meetings they set up. They can allow anyone to upload files, only allow authorized users (people who log in) to upload, or limit file uploads to just themselves. However, anyone who participates in the meeting can download any files that are shared.
Setting File Upload Permissions
The meeting organizer has the ability to set permissions for the types of attendees that can upload shared files. This is done in the meeting's Settings area on the Details card. There is a File upload permissions dropdown that includes the following permissions:
- Organizer Only - The only person who can upload files to an online meeting is the user who set up the meeting in the first place.
- Authenticated Users - Attendees who log into the online meeting are able to upload files; guests can not upload.
- Everyone - All attendees are able to upload files as needed.
Uploading and Sharing Files
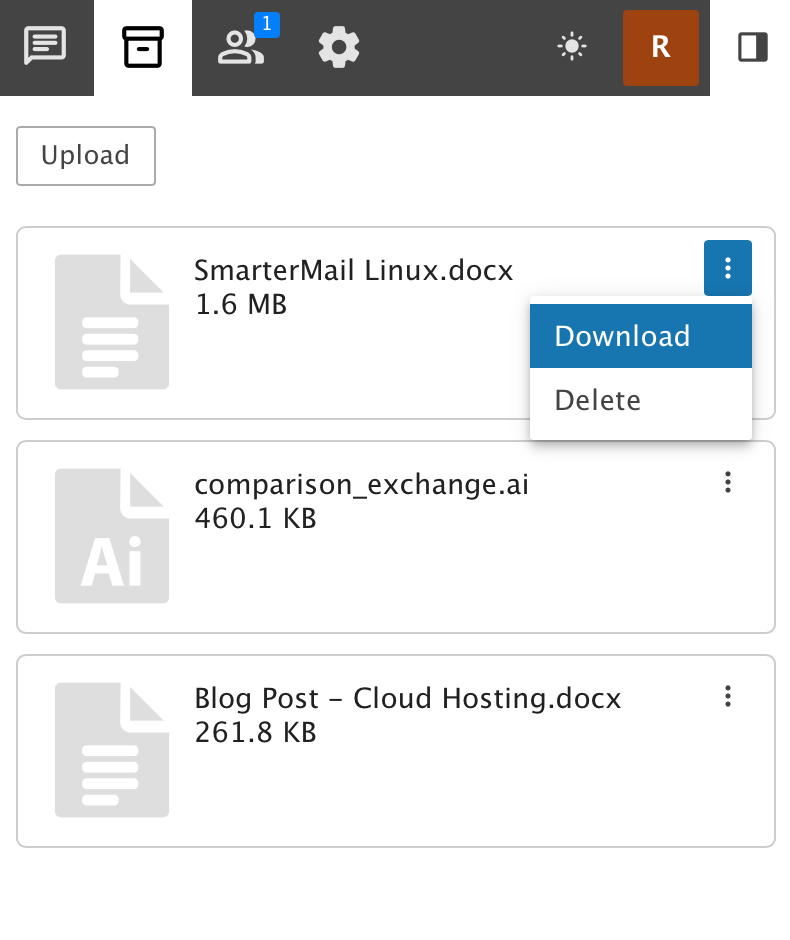
Once permissions are set, it's time to upload and share some files. A few quick things to note:
- Just as with the File Storage area, whenever possible a thumbnail of the file will be displayed. If a thumbnail can't be displayed, then an icon representing the file type will be displayed.
- Shared files will show the file name and the file size on their respective cards.
- Clicking on the Actions (⋮) icon allows for the download and/or deletion of individual file.
As for actually uploading files, there are a few ways to do this:
- Drag and Drop - You can drag and drop files directly into the list and they will be uploaded and displayed in the Files area. Files uploaded to chat will display a download link in the chat, just as they do in a regular Live Chat, but they'll show up in the Files area as well.
- Upload Button - You can also use the Upload button in the Files area or the paperclip icon in the Chat area to upload files. Regardless of which option you use, your File Explorer (or similar) opens, allowing you to choose a file to upload.
Downloading or Deleting Shared Files
Each file that's shared in an online meeting has its own card. Each card, in turn, has an Actions (⋮) option in the upper, right corner. Clicking on that gives a participant the ability to download that particular file. In addition, a participant can delete the file, should they choose to.