Domains
System administrators can use the Domains section to add or remove domains, manage the configuration of one or more domains, attach or detach domains, attach or detach users, send messages to users on the server, export a list of domains or users to CSV and more.
SmarterMail accepts both Western and non-Western character sets for domains as it supports UTF8 encoding for POP, SMTP, etc. This means that domains with non-Western characters can be added to SmarterMail, and SmarterMail will handle them just like any other domain. So if a domain contains Japanese characters, for example, SmarterMail will still be able to handle users, sending/receiving email, etc. for that domain just as if it used standard English characters.
If you are looking for a specific setting or for an explanation of a specific domain option (e.g., Forwarding Exclusions), please see the Domain Defaults page of help.
Existing domains will be displayed, but if there are no domains are listed, you will need to Add a New Domain. Basic details about each domain is displayed, which includes:
- Domain - The list of domains configured on the server. Split domains (available in SmarterMail HA ONLY) are highlighted in the list with a icon displaying two arrows pointing in opposite directions.
- Enabled - Whether the domain is enabled or disabled. A checkmark denotes if the domain is enabled or not.
- Users - The number of users configured for the domain / the number of users allowed for the domain.
- Aliases - The number of user aliases configured for the domain / the number allowed.
- Mailing Lists - The number of mailing lists configured for the domain / the number allowed.
- EAS Mailboxes - The number of EAS licenses being used / the number allowed.
- MAPI & EWS Mailboxes - The number of MAPI/EWS users / the number allowed.
- Message Archiving - Whether the domain has a specific message archiving rule set up for it. (If it does, a checkmark is displayed for the domain.)
- Disk Usage - Total disk usage by the domain, including user folders, file storage, etc. Mousing over this indicator displays a pop up showing the total disk usage, then a split by Primary and Secondary storage.
Domain Details
If a system administrator has the ability to manage individual domains, when they select a domain they'll see the following tabs. These tabs represent how the domain is set up and are, essentially, the same options available to the domain's administrator(s).
- Options - These are all of the configuration settings for the domain such as disk space and message size limits, available features, autodiscover settings, etc. Generally, these are carried over from Domain Defaults.
- Accounts - The list of all users and user aliases set up for that domain. For more information see Users Overview.
- General - These are general settings for the domain such any Domain Aliases being used, Folder and Calendar Auto-Clean rules, Email Signing and more. For more information see General Domain Settings.
- User Connections - Displays the users for the domain along with the number of connections to the different syncing protocols available. For more information, see User Connections.
- User Statuses - Displays the users for the domain along with the statuses for a variety of things such as indexing, password compliance, etc. For more information, see User Statuses.
- Content Filtering - The content filtering rules set up for all users of the domain. For more information see Domain Content Filtering.
- Events - The events set up for the entire domain. For more information see Domain Events.
- Message Archive Search - If the domain has archiving enabled, this tab allows for a search to be conducted of the archived messages. For more information see Message Archiving.
- Password Requirements - The Password Requirements, if any, configured for the domain. For more information, see Password Requirements.
- Sharing - The Shared Resources and User Groups set up for users of the domain. For more information see Domain Sharing,
- Signatures - The Signatures and Default Signature mappings set up for users of the domain. For more information see Signatures.
- Spam Filtering - The spam filtering rules set up for users of the domain. For more information see Domain Spam Filtering.
- User Defaults - The default settings for each user of the domain such as the Mailbox Size Limit, Webmail options, Service Access and more. For more information see User Defaults.
Domain Actions (⋮)
When on the Domains page, there are several Actions available to system administrators. To view these actions, click the Actions (⋮) button. You'll see the following:
- Enable / Disable / Reload Domain - These actions allow you to change the status of a domain.
- Attach Domain / Attach User / Attach Folder / Rebuild Folder / Detach Domain - These actions allow you to recover a user's account, folder or emails, as well as recover a domain or detach it so it can be moved to another server.
- Export Domains / Users to CSV - These actions allow you to export a list of all domains, or all users for all domains, to a CSV file.
- Send Email / Notification - These actions allow you to send an email or reminder notification to users on the server.
Enable / Disable / Reload Domain
The ability to change the status of a domain — either enabling it, disabling it, or refreshing it.
Enable / Disable Domain
Enabled domains are fully functional. Disabled domains cannot send email and users cannot log in to the web interface. However, the domain will still receive email to prevent email loss. This option is a good way to temporarily shut off a domain without deleting it.
Reload Domain
Reloading a domain is essentially "rebooting" it: it deletes all memory and cache associated with the domain and reloads all settings (domain, user, etc.) from the system files on disk. If you see odd behavior with users or other odd behavior, reloading the domain may clear things up.
Attach User / Attach Folder / Rebuild Folder
System administrators can restore a user's emails, email folders or their entire user account, which is extremely useful if a folder or email is mistakenly deleted or if there is corruption within the mailbox.
To restore user data, click on the Actions (⋮) button in the Domains section. Then choose the type of restore you would like to perform:
- Attach User - Select this option to attach a user that is on disk but not in the domain. In other words, to restore an entire user's account.
- Attach Folder - Select this option to attach a folder that is on disk but not in the account. In other words, to restore a user's email folder.
- Rebuild Folder - Select this option to copy .grp files or .eml files into an existing user's folder and have SmarterMail re-build that folder to include the new .grp and .eml files. In other words, to restore a user's emails.
The following options will be available, depending on the restore type selected.
- Email - The full email address of the user being restored or the full email address of the owner of the folder being attached or rebuilt.
- Folder Path - The path of the folder within the web interface that will be used to rebuild or restore an email folder. For example, if you're restoring a subfolder that was created under the Inbox, the folder path would look like: Inbox\Example Folder.
- Recursive - Enable this option to attach any subfolders that are found within a folder that is being attached or rebuilt.
Attach / Reload / Detach Domain
The ability to quickly and easily move domains from one SmarterMail server to another, without having to stop the mail server or halt the mail service, is crucial for system administrators.
Attach Domain
Attaching a domain makes it easy to add a new domain, complete with users, configuration settings, etc. Administrators can attach a single domain or, when adding in a "Base Domain Path" (e.g., S:/SmarterMail/Domains), multiple domains at the same time. The important thing to remember is that the files and folders of the domains to attach are placed in the location specified in the path. For single domains, the files and folders should be placed in the same location as the existing domain folder. SmarterMail will then add any attached domains to the domains.json file.
Reload Domain
Reloading a domain is essentially "rebooting" the domain: it clears all webmail sessions, reloads the domain's settings, all user settings and files for the domain. If you see odd behavior with users or other odd behavior, reloading the domain may clear things up.
Detach Domain
Detaching a domain essentially prepares the domain for a move to another server, or even just moving the domain to another drive. Detaching removes the domain from the domains.json file, then, once you've made whatever changes are necessary, you simply attach the domain again. It also logs out any users who are logged in and, more importantly, will remove any Domain Aliases that are set up for the domain. These would have to be re-added once the domain is attached in its new location.
Attaching SmarterMail 16.x and Older Domains
If you try to attach a domain from 16.x or older to a newer installation, you'll get a warning saying: "This domain is not valid for this version. To convert and attach the domain, stop the SmarterMail Service, add the domain path to the domains.json file, then restart. For more information, refer to the Online Help.” This warning occurs because the domain needs to go through a significant conversion process before it can be attached to the installation. During the conversion process, XML files will be converted to JSON format, mailboxes will be switched to use the new indexing system, and system files will be modified to help increase SmarterMail speed, reduce disk/CPU and, overall, make for a smoother experience.
If you have a domain from an older version that you want to add to a latest Build, follow these steps:
- Before beginning, make a backup copy of the domains.json file and the domain folder you wish to attach.
- Place the domain folder where you would like it to reside.
- Stop the SmarterMail Service.
- Using Notepad or a similar text editor, open the domains.json file.
- Add the domain path in the same format as the other domains. The domain path should be entered in the format required by your operating system. For example, on Windowds:
- Save the file.
- Start the SmarterMail Service.
"domainName.com": {
        "data_path": "c:\\SmarterMail\\Domains\\domainName.com"
    }
Depending on the size of the domain, it may take anywhere from a few seconds or up to an hour for the domain conversion to complete. During this time, the SmarterMail server will be inaccessible. You can access the conversion status page at any time by going to https://your_mail_domain/interface/convert-status. You'll need to log in with a system admin username and password. As the domain conversion runs, you'll see a screen similar to the following:
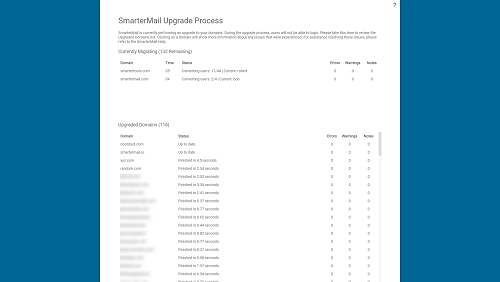
Details of the conversion process can also be found in the conversion log which is stored by default at C:\SmarterMail\Logs\{date}-conversion.log.
Export Domains / Users to CSV
System administrators can export a list of all domains or users on the server in CSV format. The domain CSV spreadsheet will include every domain name along with its status, size, number of users, number of aliases, user limits, throttling configuration, enabled features and more. The user CSV will list every username, sorted by domain, along with their display name, authentication type, title, full name, birthday, phone number, home address, work address, job title, disk space used, status, last login date and more.
System administrators with Manage Domain permissions can also export the Users for specific domains. All they do is go to the Accounts tab for the domain — there is an Export Users option under the Actions (⋮) button on the Accounts tab.
To use the export feature, click on the Actions (⋮) button in the Domains sections and then click on Export Domains to CSV to export a list of domains or Export Users to CSV to export a list of users.
Send Email / Notification
SmarterMail gives system administrators the opportunity to send mass emails and reminders to the users on the SmarterMail server. This can be extremely beneficial for notifying users of a specific domain about any policy changes, announcing work being done that may impact access to the mail server, sending warnings to specific users about any potential mail server abuse, sending emails to all domain administrators regarding settings changes and much more. It's a simple way for system administrators to keep mail server users up-to-date and current about a variety of topics.
Send Email
To send a mass email, click the Actions (⋮) button in the Domains section and then click Send Email. The mass messaging options will load in a modal window and the following fields should be completed:
- From - The individual sending the email message. "System Administrator" will be entered as a default.
- To - Select the message recipients from the list.
- To Friendly Name - This is a friendly name or description for the recipients that will appear in conjunction with their email address in the To field. For example, if you're sending an email to all users of the domain example.com you could use something like "Example.com User".
- Subject - The subject of the email.
- Message - Type the text of the message in this field. Messages can be in plain text or stylized with HTML formatting.
Once you complete all the fields, click the Send button to deliver the message.
Send Notification
Notifications are a quick and easy way to send information to a group of users on the mail server. Similar to sending an email, a notification will stay within the mail server and be displayed in users' notifications area rather than being sent to them as an actual email message. For example, if you send a message to all users of a domain about some upcoming maintenance work on the mail server, you can use Send Notification to do a quick follow up reminding the users of the scheduled work.
To send a mass notification, click on the Actions (⋮) button in the Domains section and then click on Send Notification. The messaging options will load in a modal window and the following fields should be completed:
- To - Select the message recipients from the list.
- Subject - The subject of the email.
- Message - Type the text of the message in this field.
Once you complete all the fields, click the Send button to deliver the notification message.
Relevant Knowledge Base Articles
We have created several knowledge base articles for common situations where use of "Attach Domain" or "Rebuild Folder" are necessary. Below is a partial list of articles that detail the steps necessary to do things such as restore a user's folders, migrating or moving a domain from one server to another, etc.
- Backup and Restore SmarterMail
- Restore a User's Account, Folders, or Emails
- Migrate SmarterMail to a Different Server
- Migrate SmarterMail to a Different Server (Using Robocopy)
- Move a Domain from One SmarterMail Server to Another
- Move a Domain to a Different Hard Drive on the Same Server
- Move SmarterMail from Hosted to Self-Installed
- Marketplace Help for System Administrators