SmarterMail for WHMCS
Overall Description
SmarterMail for WHMCS consists of two complementary open-source modules: one for setting up a server for use within WHMCS, and one for provisioning “plans” or “products” that can be sold within WHMCS. The provisioning module includes the ability to create packages based off specific SmarterMail features such as mailbox counts, disk space allocations, etc. It also offers domain administrators and end users some management capabilities. For example, domain administrators can add users, add aliases, and more while end users can see some basic information about their accounts as well as log directly in to SmarterMail.
These were developed by SmarterTools as replacements for the two previous WHMCS modules that were available. As a result, anyone transitioning to the new modules will need to create new products within WHMCS. Customers who use products configured using the older module can coexist with customers created using the new modules, but for the sake of consistency we recommend those customers be moved over to new products created using this newly developed solution.
Skip to:
- Prerequisites
- Installing the Modules
- Configuring the Addon Module
- Configuring Your Server(s)
- Configuring Your Product(s)/Service(s)
- Configurable Options
- Custom Fields
- Enabling Debug Logging
Goals
The primary goals of the integration of SmarterMail are twofold:
- Allow businesses to create email packages based off configurable options within SmarterMail, such as individual mailbox size, the ability to synchronize to email clients and mobile devices with Exchange-like features, etc., and
- Reduce both domain and server administrator labor. With the module installed, the process of setting up a SmarterMail server, then managing domains and accounts on the server, is automated through WHMCS.
The integration provides the following services:
Admin Area Features
- Create Domains
- Suspend Domains
- Unsuspend Domains
- Terminate Domains
- Upgrade Packages
- Add Configurable Options for complementing Products/Services
- Add/manage Configurable Options
- Add/manage Custom Fields
- Change Passwords
Client Area Features (i.e., Domain Administration)
- Manage Mailboxes: Add, delete, modify settings, change passwords
- Manage User Aliases: add/delete
- Manage Domain Aliases
- Login to the SmarterMail webmail interface
- Upgrade/Downgrade Products
- Upgrade/Downgrade Options
Prerequisites
- Existing installation of WHMCS.
- Existing installation of WHM/CPanel. (If used.)
- Licensed installation of SmarterMail Build 100.0.8580 or later.
Installing the Modules
Installing the SmarterMail module is no different than installing any modules within WHMCS.
- Extract the zip file that contains the SmarterMail module and add-on.
- Rename the smartermail_addonmodule folder to “smartermail” and place it in “WHMCS\modules\addons".
- Rename the smartermail_provisioning folder to “smartermail” and place it in “WHMCS\modules\servers”.
Configuring the Addon Module
- Login to the admin side of your WHMCS installation.
- Go to System Settings → Addon Modules
- Click "Activate" next to “SmarterMail Module”
- Click “Configure” next to “SmarterMail Module” and set it up as per your usual module configurations. Be sure to set the appropriate Access Control permissions as well.
Next, you will want to set up the actual SmarterMail server.
Configuring You Server(s)
Once the SmarterMail module is installed, you can begin adding new mail servers to your WHMCS installation and begin provisioning domains and mailboxes within SmarterMail.
Creating a Group
While this step is optional, creating Groups for servers you set up in WHMCS is a great way to help keep things organized. Therefore, it's recommended that you set up a group for your SmarterMail server(s).
- On the Servers page, click the “Create New Group” button.
- Set a group name (e.g., Mail Servers).
- Fill Type is purely optional and based on preference.
- In the “Selected Servers” box, choose your SmarterMail Server(s).
- Click the “Add” link to move the server(s) from the left to the right box.
- Be sure to “Save Changes”.
Adding a Server
- Click on “Servers” under the Products/Services on the left menu. Alternatively, select “Servers” from the System Settings area.
- Click “Add New Server”
- When presented with the Add Server info, click the blue “Go to Advanced Mode” button as this gives you more options.
- Fill in the following settings:
- Name - The friendly name for your SmarterMail server within WHMCS
- Hostname - The hostname for your server. (E.g., mail.your_domain.com)
- IP Address - The primary IP address for your SmarterMail server.
- Assigned IP Addresses - Re-enter the primary IP as well as any other IP addresses used by your SmarterMail server.
- Module - Select "SmarterMail" from the dropdown.
- Username/Password - The username and password of the primary system administrator set up on the server.
- Secure - Ideally, you WILL want to use SSL for the connection, so check this box.
- Be sure to Save Changes.
If you experience problems, and Module Logging is enabled, you can go to http(s)://your_WHMCS_hostname.com/admin/addonmodules.php?module=smartermail to check the error logs
Configure Your Product(s)/Service(s)
Now that the modules have been installed and the SmarterMail server(s) configured, you now can configure individual Product\Service packages within WHMCS based on SmarterMail.
As with Servers, you can create groups of products/services to help keep things better organized. Again, this is recommended, though purely optional. For the sake of this section, we will create a “SmarterMail” group, then add products to that group.
Create a Product Group
- If not already, login to the admin side of WHMCS.
- Go to System Settings → Products/Services. (Alternatively, if you're already in an administrative area of WHMCS, select “Products/Services” from the left navigation menu.)
- Click the “Create New Group” button.
- Set your “Product Group Name”. (E.g., SmarterMail)
- Add in any additional information as you see fit, such as the Group Headline, Tagline, and Features. You can also select an Order Form Template that customers will use to order the product(s).
- Be sure to save your changes.
Create a Product
- Click the “Create New Product” button.
- Select the product type.
- For “Product Group”, select the group you created above.
- Set the “Product Name”. (E.g., Basic Email.)
- For the “Module”, select SmarterMail from the dropdown.
- Click the “Continue” button. Once this is done, you'll be presented with a number of tabs detailing various aspects of your new product. For example, the Product Details, Pricing, Configurable Options, etc.
- Once everything is configured, be sure to “Save Changes”.
A Note About Module Settings
The SmarterMail module gives providers the ability to configure various features of SmarterMail based on the product that is created. The idea, here, is that service provider can create email “packages” based on the features available. For example, a basic email plan may offer email a minimal number of users, aliases, mailbox size, and domain disk space. Then, a more robust product can be created that increases things like disk space and mailbox size, then adds mailing lists, automated forwarding, live chat, and file storage.
Configurable Options
A new feature of the module is the ability to create “email plans” that offer base limits for things like account size, domain disk space, and more. However, there are times when users may require more allocations for these things than they were originally provided, or they require additional features that aren't part of their actual hosting plan. The ability to sync their account to their mobile device, for example, using EAS.
In these cases, configurable options can be used to create “Add Ons” for existing products you've created. A Configurable Option will essentially override the standard settings used to initially create the products within WHMCS. Users can then include these options prior to checkout, or they can be added to a user's plan on an as needed basis. Each option can have its own pricing, thereby creating additional revenue opportunities.
WHMCS will pass information to SmarterMail when you set up configurable options using the following format: <variable size> | <friendly text>. (Where “variable size” requires numerical values only.)
For example, to add and options for adding EAS accounts, you would create a configurable option like this:
5 | 5 EAS Accounts = 5 EAS Accounts
10 | 10 EAS Accounts = 10 EAS Accounts
Adding the friendly text makes the options more descriptive, so users know exactly what they're getting.
The following are available as Configurable Options, with the associated, internal variable name in parentheses:
- Users (users) - The number of users supported by the domain. (E.g., 10 | Additional Users)
- Mailbox Size (mailbox_size) – Size, in MB, to set the mailbox size for each user. (E.g., 1000 | 1 GB)
- Domain Size (domain_size) – Total size, in MB, allowed for the domain. (E.g., 10000 | 10 GB)
- Aliases (aliases) – Number of user aliases. (E.g., 100 | 100 Aliases)
- Domain Aliases (domain_aliases)– Number of domain aliases. (E.g., 10 | 10 Domain Aliases)
- EAS Accounts (accounts_eas) – Allowed number of EAS devices/users. (E.g., 20 | 20 EAS Accounts)
- MAPI & EWS Accounts (accounts_mapiews- Allowed number of EWS/MAPI users. (E.g., 20 | 20 MAPI & EWS Accounts)
- Exchange Accounts (accounts_exchange) – Combines both MAPI & EWS Accounts and EAS Accounts into one option so you don't have to set each item individually. (E.g., 20 | 20 Exchange Accounts)
Create a Group
- If not already, login to the admin side of WHMCS.
- Go to System Settings → Configurable Options. (Alternatively, if you're already in an administrative area of WHMCS, select “Configurable Options” from the left navigation menu.)
- Click the “Create a New Group” button.
- Set your options, such as Group Name, Description, and select the Assigned Products.
- Save your changes.
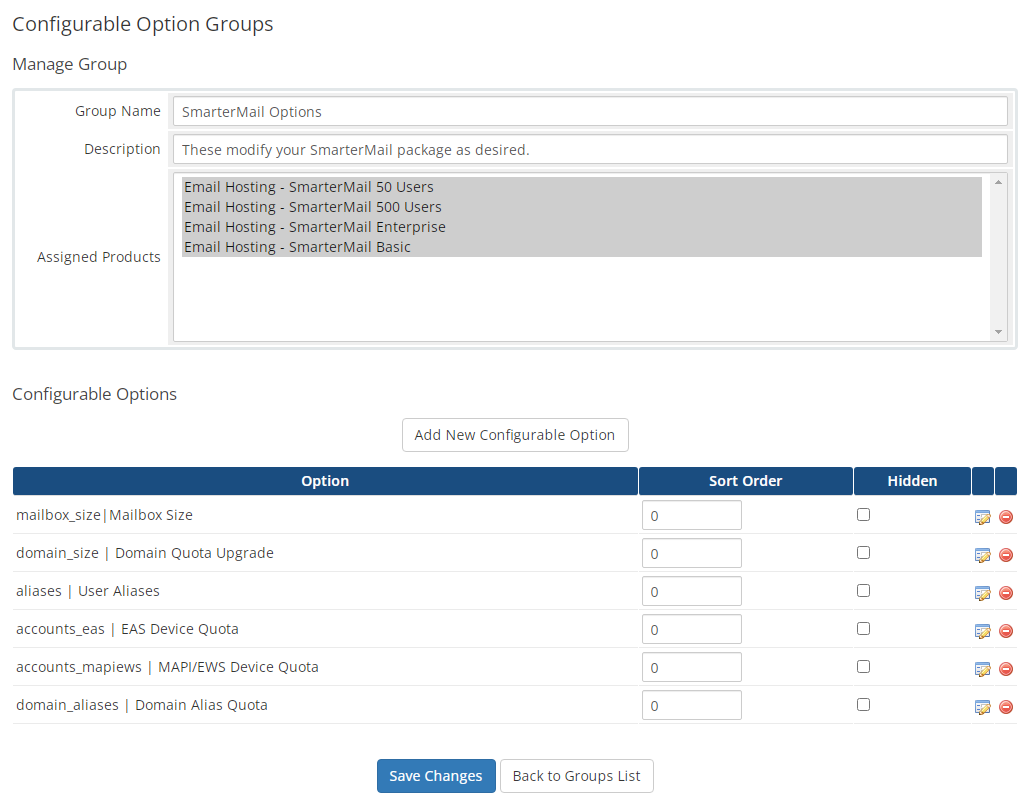
Create Options
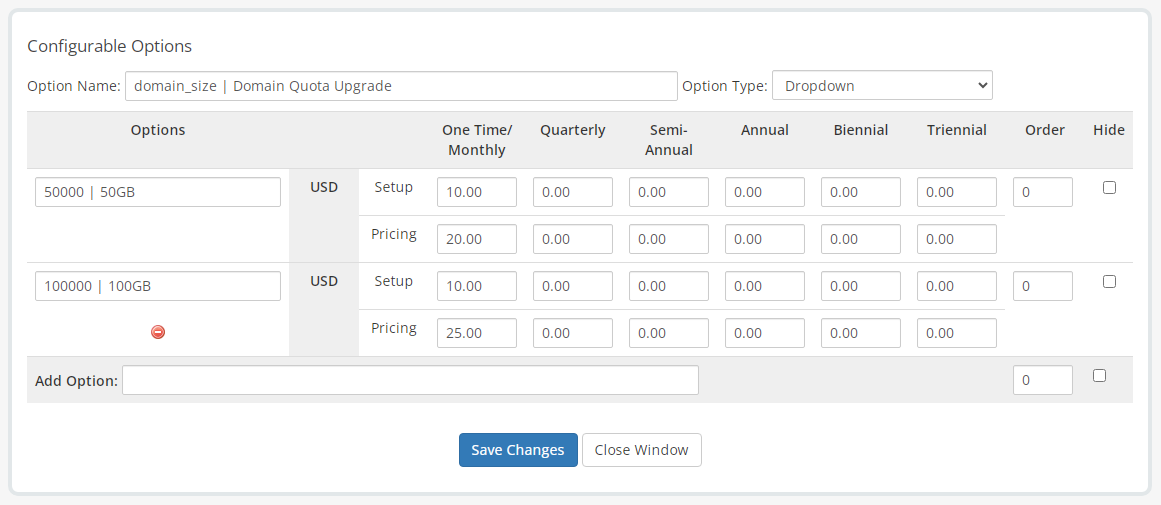
- Click the “Add New Configurable Option” button. Set the Option Name and the Option Type. For many options, the Dropdown type will suffice as it allows you to create multiple “upgrades” based on counts. (E.g.,
- Disk Space increases.)
- Continue adding Options to the group until finished. NOTE: it IS possible to add multiple options to ONE group.)
- Be sure to save your changes, the close the Configurable Options window.
- Save your changes on the Configurable Option Groups page.
This is what the option would look like for adding disk space for a domain:
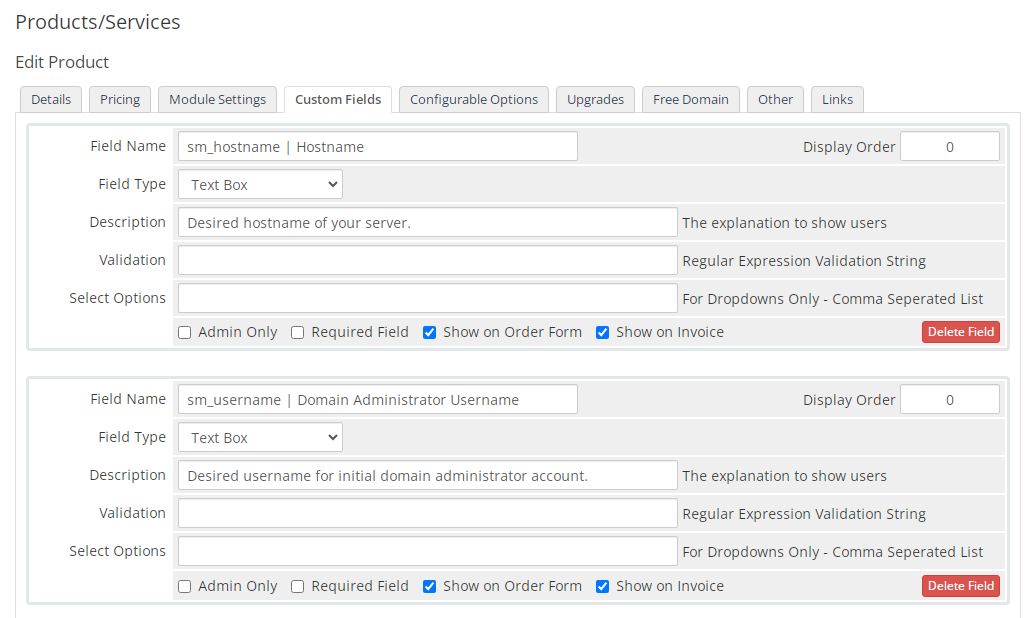
Custom Fields
Custom fields allow for some customization of product creation and can help automate things like setting up domains and users within SmarterMail. “Username” is a perfect example of a custom field as it can be used to set the username for a user that essentially becomes their email address.
To add Custom Fields, do the following:
- Click Wrench/Settings → System Settings → Products/Services
- Select the desired Product.
- Field names use the following format: <variable name> | <friendly text>
- You can use Regex in the validation field as all the supported fields use Text boxes. For example: Ask for a username/password combo to create the domain admin account, "sm_username|Username" and "sm_password|Password"
The variables available for Custom Fields are as follows:
- sm_hostname - Sets a custom hostname for the domain. By default, SmarterMail creates the hostname as "mail.{domain}". Using this Custom Field allows you to use a different hostname.
- sm_username - Initial username that is appended to the “@domain” for the email address. If this is left blank, it defaults to the first 8 characters of the domain name.
- sm_password - Initial user password. If this is left blank, a 10-character password is automatically generated.
Enabling Debug Logging
There is debug logging available in the module, but it's not turned on by default. To turn it on do the following:
- Open modules\addons\smartermail2\smartermail2_functions.php
- Find line 630
- Uncomment the line (logActivity($msf, $num);
- Save your changes
The file can be edited while WHMCS is running, so no need to stop/restart. The log is saved to the "System Logs" and can be accessed from the WHMCS admin area.