Hub and Node Set Up and Configuration
Once your hubs and nodes are installed, it's time to get them set up and configured. Hubs simply need to be set up, using the hub's own setup wizard. Nodes take two passes: you first register the node in a hub, then you run the node's setup wizard so that it enrolls itself into the cluster. The order matters. A hub will only admit a node it already knows about, so the node's configuration has to exist in the hub before the node itself is set up.
Port Requirements
In order for hubs and nodes to communicate, certain ports are required. Be sure that the following ports are available adn open:
- Ports 80 & 443
- Port 17003 - outbound from the node(s) and inbound to the hub(s)
- Port 17993 - inbound/outbound for hub/node gRPC cluster traffic
Hub Set Up
Once installation completes, navigate to the hub using a web browser. As you probably don't have a hostname set up just yet, if your OS uses a GUI the default location is http://localhost:17017. If you do have a hostname set up and it's accessible over port 80, you can use that. Either address loads the "Welcome to SmarterMail" setup wizard for your hub, which walks through four steps: the shared hub path, license activation, the cluster's identity, and the cluster administrator account.
Step 1: Shared Hub Path
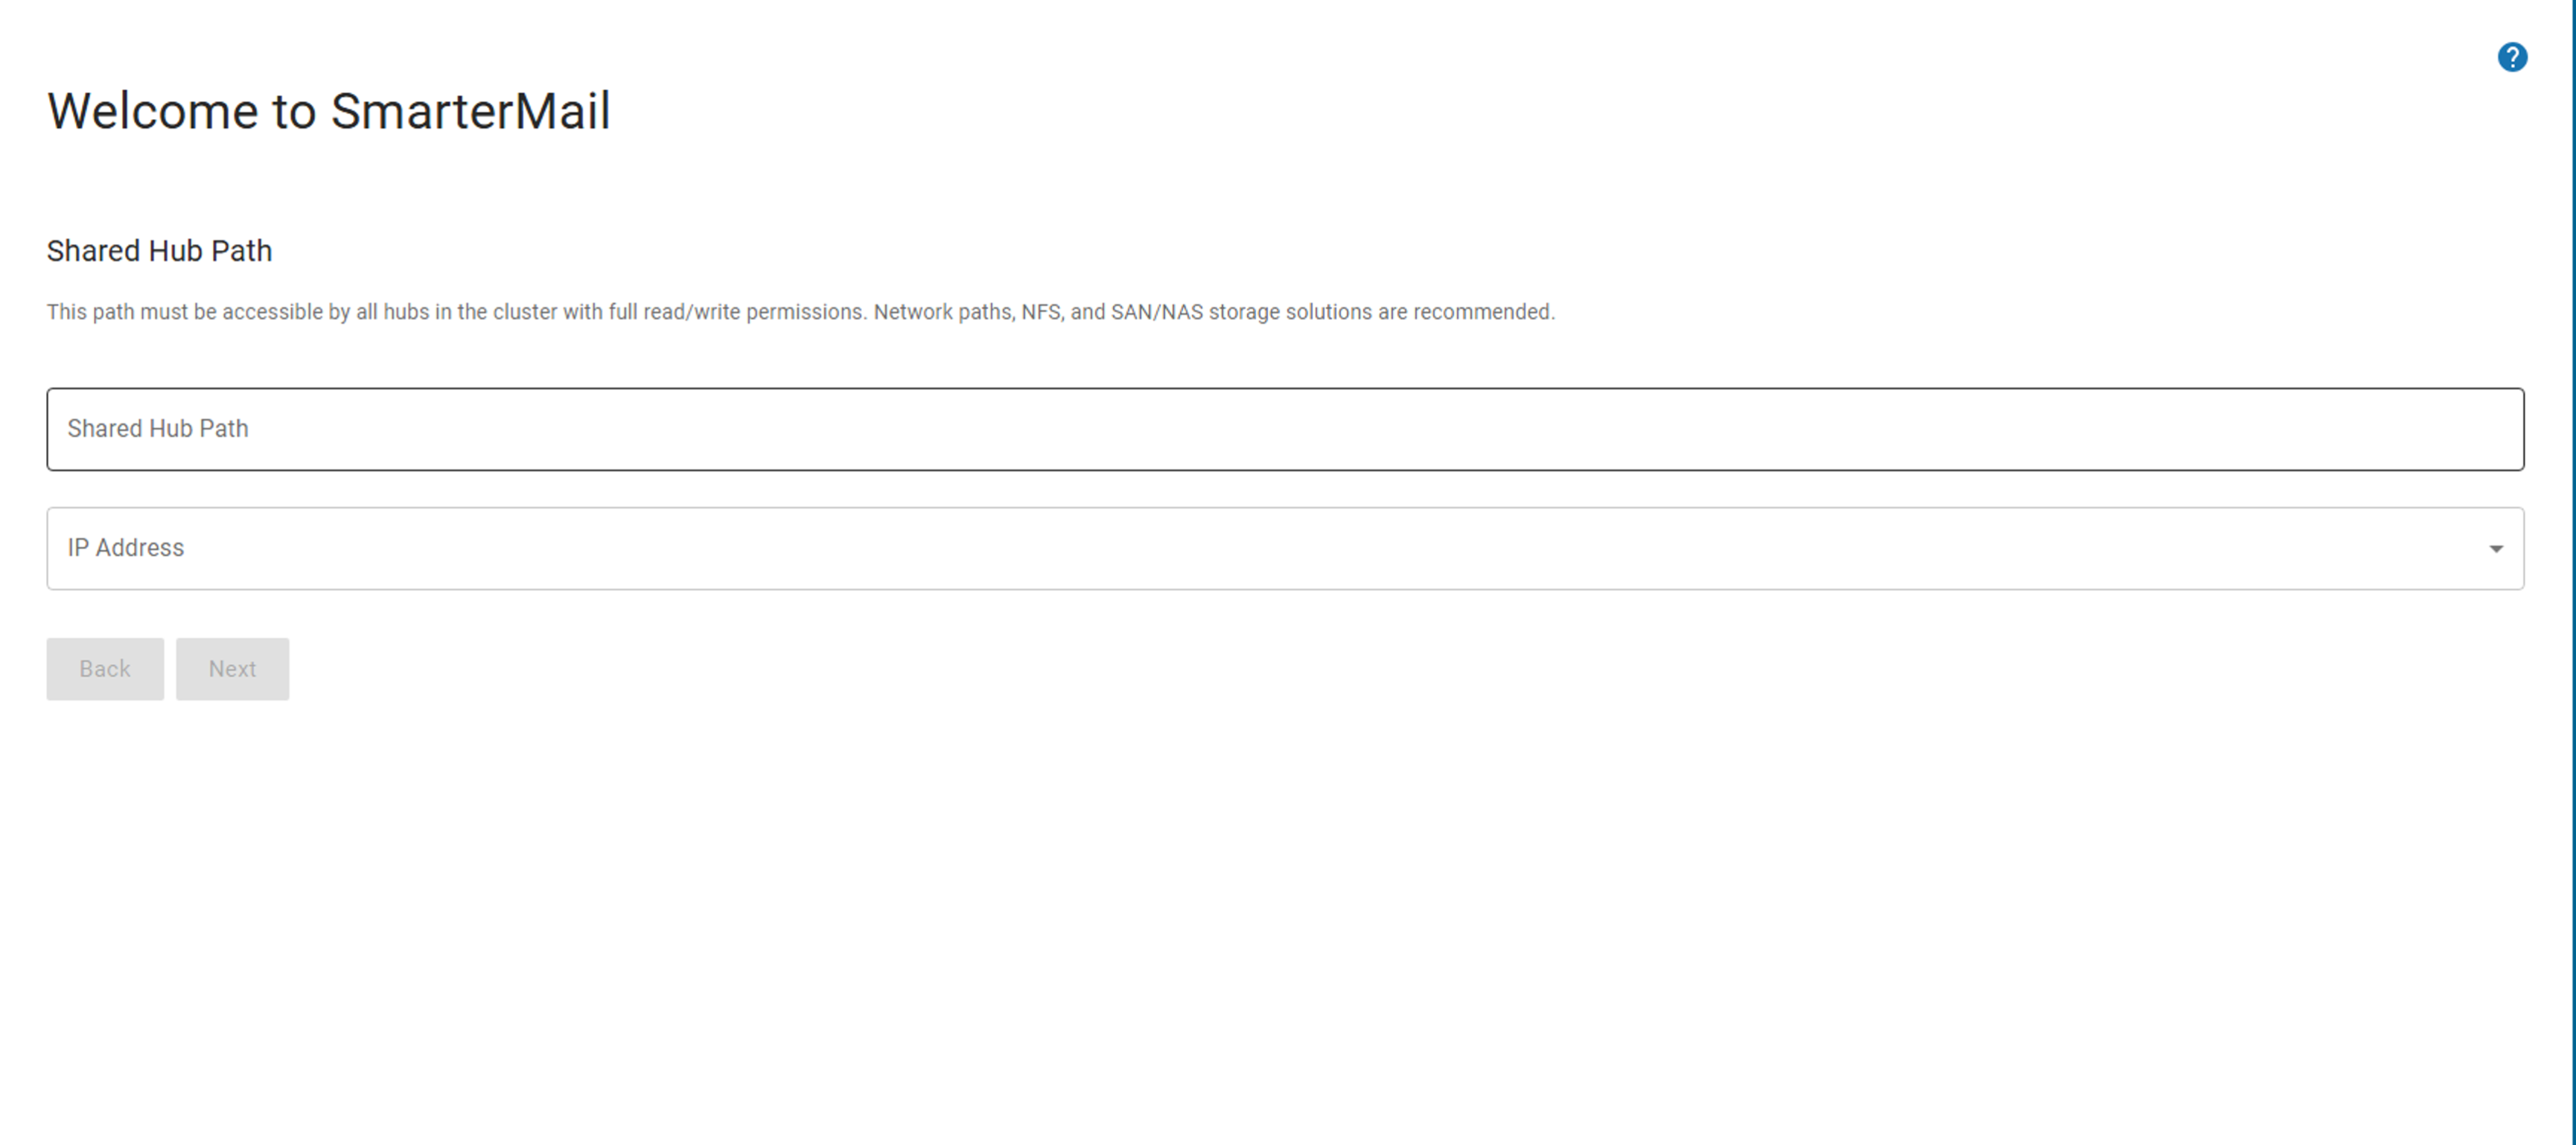
- Shared Hub Path - If you remember back to the SmarterMail HA Installation Instructions, you set up a shared directory, and within that share you created various folders: one that will be used for your hubs, and then one for each node you planned. This is where you put the path to the share you set up for your hub. For example, "/data/hub/". The path must be reachable by every hub in the cluster with full read/write permissions, which is why network paths, NFS and SAN/NAS storage are recommended. Just remember: the Shared Hub Path on each additional hub you add to your cluster MUST match!
- IP Address Or Hostname - The address the hub itself is reached at. The wizard validates the value before it will continue, and the address has to resolve to the machine you're setting up; if it doesn't, setup stops with "Hostname must map to local system."
If the path you enter isn't detected as a network drive or network filesystem, the wizard doesn't fail outright. Instead it warns you that the path may not be reachable by the other hubs and asks you to tick "I understand the risks and want to proceed with this path" before the Next button becomes available. A local path is workable for a single-hub evaluation, but a second hub will have no way to read it, so plan on shared storage for anything you intend to grow.
Step 2: Activate License
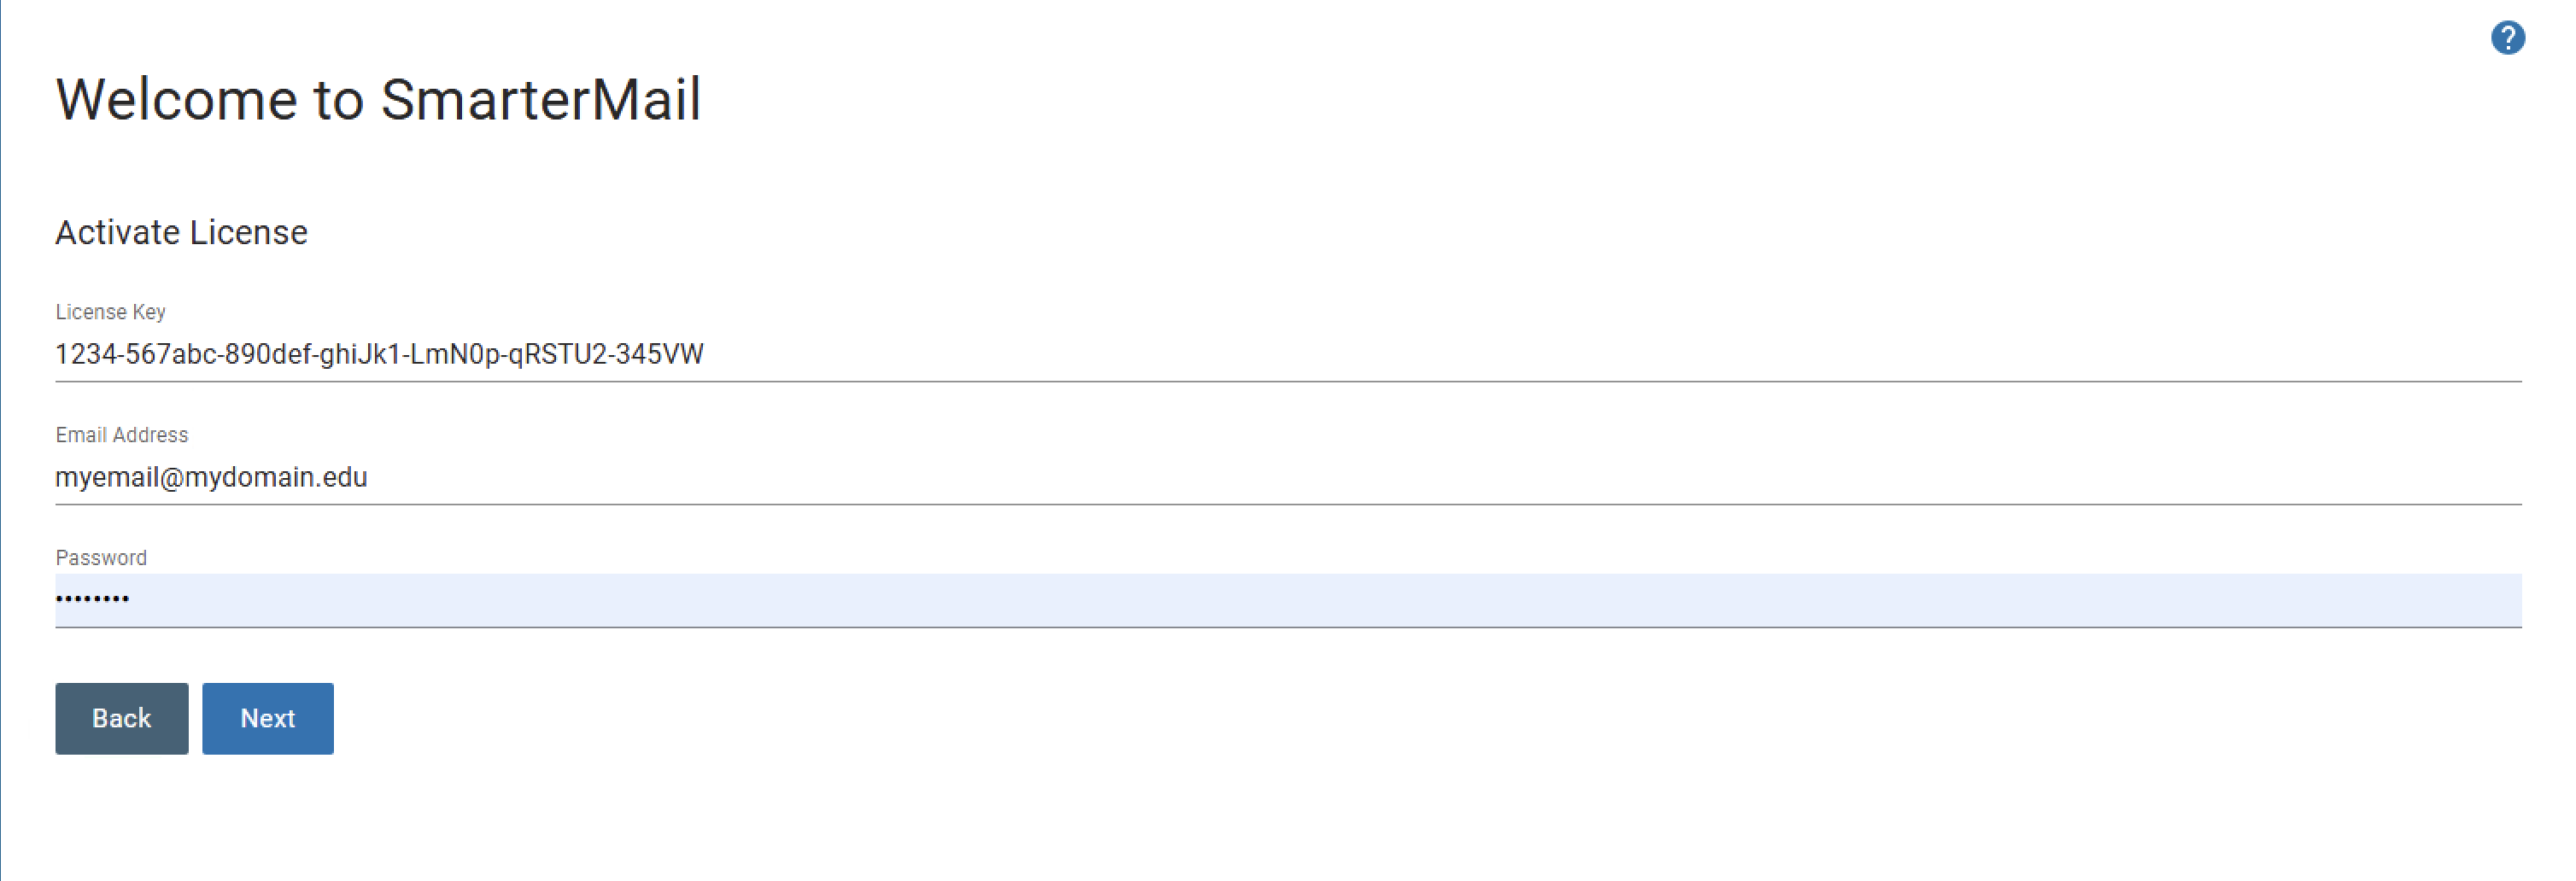
- License Key - This is the license key associated with your HA installation. You can find it by logging in to your SmarterTools account.
- Email Address - The email address that's associated to the SmarterTools account that owns the license key.
- Password - The password that's associated to that SmarterTools account.
Step 3: Cluster Identity
Cluster identity is the step that makes the rest of the cluster possible, and it's the one worth slowing down for. The three values you enter here are stamped into the certificate issued to every hub and every node in the cluster, both as the SPIFFE URI and as the certificate's DNS SAN. Every member has to be given exactly the same three values. A node that's handed a different trust domain, environment or DNS suffix will fail certificate validation and will not be able to join.
- Cluster Trust Domain - The logical name of the cluster's certificate authority. This defaults to "smartermail" and there's rarely a reason to change it, but if you run more than one SmarterMail HA cluster, giving each its own trust domain keeps a member of one cluster from ever being accepted by the other.
- Cluster Environment - Optional. A segment inserted between a member's hostname and the DNS suffix, useful when you want a single suffix to cover more than one deployment. For example, "prod.east". Leave it blank if you aren't segmenting, and if you leave it blank on the hub, leave it blank on every node.
- Cluster DNS Suffix - The DNS suffix all cluster members share. For example, "cluster.acme.example.com".
Together, these determine the fully qualified name each cluster member is reached at. With an environment set, that name is hostname.environment.dnssuffix; with the environment left blank, it's hostname.dnssuffix. Using the examples above, a hub named "hub1" would be hub1.prod.east.cluster.acme.example.com. Write these three values down. You'll type them again on every node you set up, and they have to match character for character.
Step 4: Cluster Administrator
Finally you'll set up the cluster administrator account. This is similar to a system administrator login that's created for SmarterMail Professional and Enterprise installations, but it's for the management of the entire SmarterMail HA cluster.
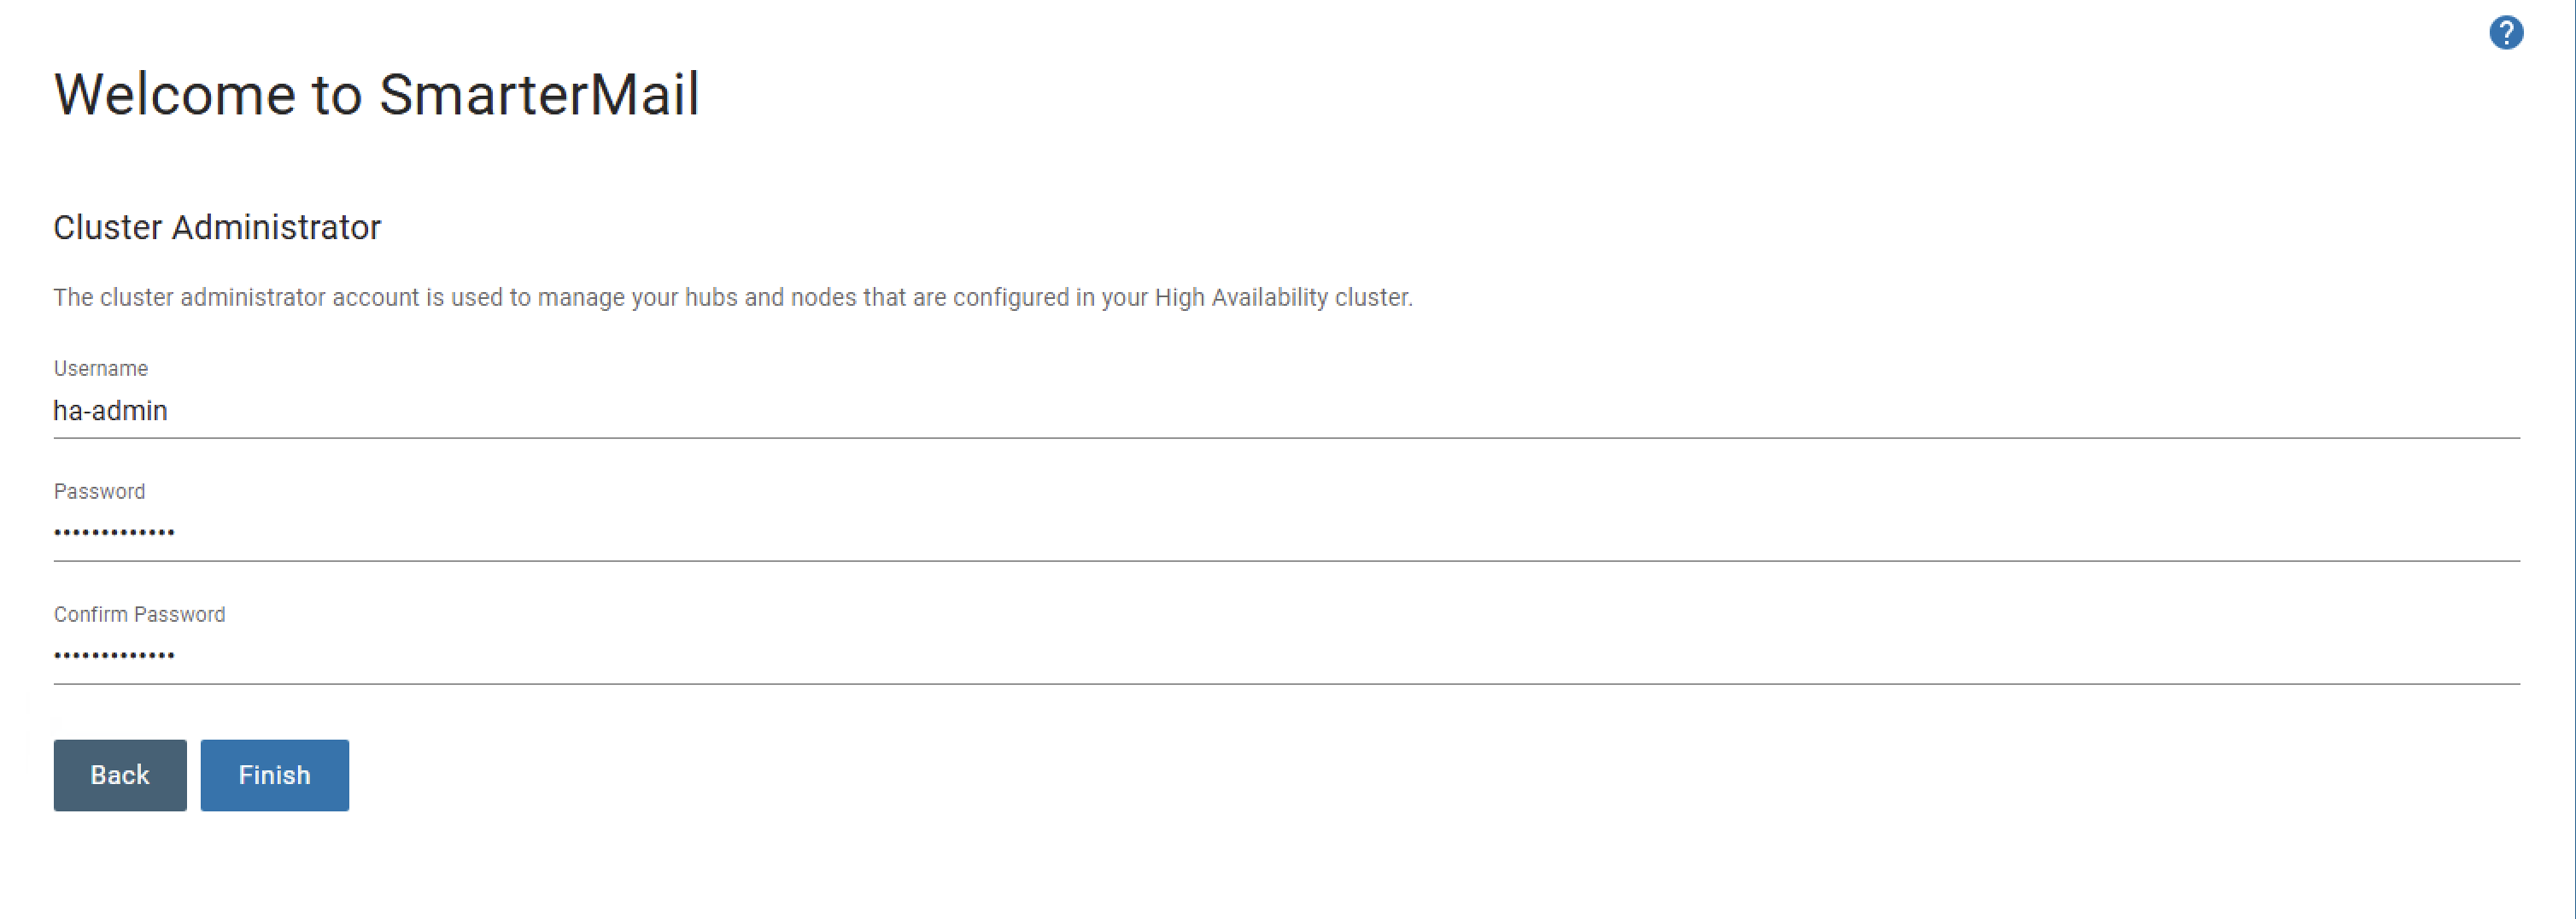
- Username - The username that will be used to log in to the SmarterMail HA cluster.
- Password / Confirm Password - The password that will be associated to the cluster administrator account. It must be at least 8 characters long and contain an uppercase letter, a lowercase letter and a number.
Once you click the Finish button, you'll be redirected to the hub login page. Use the username and password you just created and you'll be logged in to your cluster.
NOTE: The wizard skips any step that's already been satisfied. A second or third hub pointed at the same Shared Hub Path reads the license, cluster identity and cluster administrator out of the ha-settings.json file in that share, so after step 1 it will usually go straight to the login page. That's expected, and it's the reason the Shared Hub Path has to match.
Node Configuration
Prior to setting up your node (and any additional node you add to your cluster), you need to configure it in your hub. What this does is essentially tie the node you'll be setting up to your hub: the hub will only issue a cluster certificate to a machine name it has been told to expect, calling from an IP address it has been told to expect. Therefore, in order to configure a node you'll need to log in to a hub as the cluster administrator. Once you've done this, you can begin node configuration.
- Go to Manage and click on the Nodes tab. When you're just getting started, this tab will be blank. Moving forward, every time a node is added and associated to the hub you're logged in to, it will appear on this tab.
- To add a node, click the New button. The Node Configuration modal will appear.
- On this modal you'll need to set up a few pieces of information in order to get your node added to the hub. This includes:
- IP Address - The address the node will contact the hub from. When the node runs its setup wizard, the hub compares the source address of the incoming enrollment request against this value and refuses the request if the two don't match. Enter the address the node actually egresses from, which on a NATed network is not necessarily the address configured on the node's own interface.
- Machine Name - The node's machine name. (E.g., smartermail-node1.) This is used to identify each node when it connects to the cluster, and it must be the machine name of the server you're about to set up, because that's the name the node presents when it enrolls. It also has to be unique across every node and standby node already configured in the cluster.
- Standby Node - Toggle this if you want the node you're setting up to be a standby (non-active) node. A standby node holds no volume of its own, so the mount fields below are hidden when this is enabled. It waits in reserve and is activated by the hub when an active node fails over. This toggle can only be set when the node is first created.
- Allow Node To Failover When Unavailable - Toggle this if you want the node set up so that it will automatically fail over to any node configured as a standby. This appears only for active nodes.
- Volume Mount Path - The path to the share created for this particular node. For example: /data/node1/. This is required for active nodes, and it's validated against the path rules for the node's operating system. Everything the node stores is derived from this path, so get it right the first time.
- Mount Script File Name - The Linux or Windows script or command used to mount the share referenced in Volume Mount Path.
- Unmount Script File Name - The script or command used to unmount that same share. Mount and unmount must be supplied together. Providing one without the other is rejected when you save.
- Include Arguments - Toggle this to allow arguments in the mount or unmount commands. For example, with this toggled you can have your mount or unmount commands execute a script that performs a specific action. That means your mount command may look something like this:
This executes the mount.sh script, which performs the mounting of the share./users/smartermail/SmarterMailHA-C/mount-1/mount.sh
- Click the Save button to save your configuration.
NOTE: The IP Address you enter is consumed by a successful join. Once the node has enrolled, the hub clears the stored value, which means the registration can't be replayed later from a different machine. If you ever need to re-enroll that node, such as after rebuilding the server, edit its configuration and enter the IP address again. Machine Name and IP Address can only be edited while the node has not yet initialized and is inactive; once a node is up and running, both are fixed.
NOTE: Earlier releases generated a One Time Password on this modal that you had to copy down and type into the node. That's no longer the case. Enrollment is now authenticated by the registered machine name and source IP address over TLS, and the node's setup wizard no longer asks for a password.
Once the above is done, it's time to log in to the node and get it set up.
Node Set Up
Now that the node is configured in the hub, the node itself needs to be set up. Setting up a node is really not much different than setting up a SmarterMail Enterprise installation. In fact, the "Welcome to SmarterMail" page that's displayed is exactly the same for a standalone installation as it is for SmarterMail HA. The difference is that there are two options when configuring SmarterMail:
- SmarterMail Standalone - Configure SmarterMail as a single mail server. This is a typical SmarterMail installation.
- SmarterMail High Availability - Configure SmarterMail in a high availability cluster and install as a single SmarterMail node.
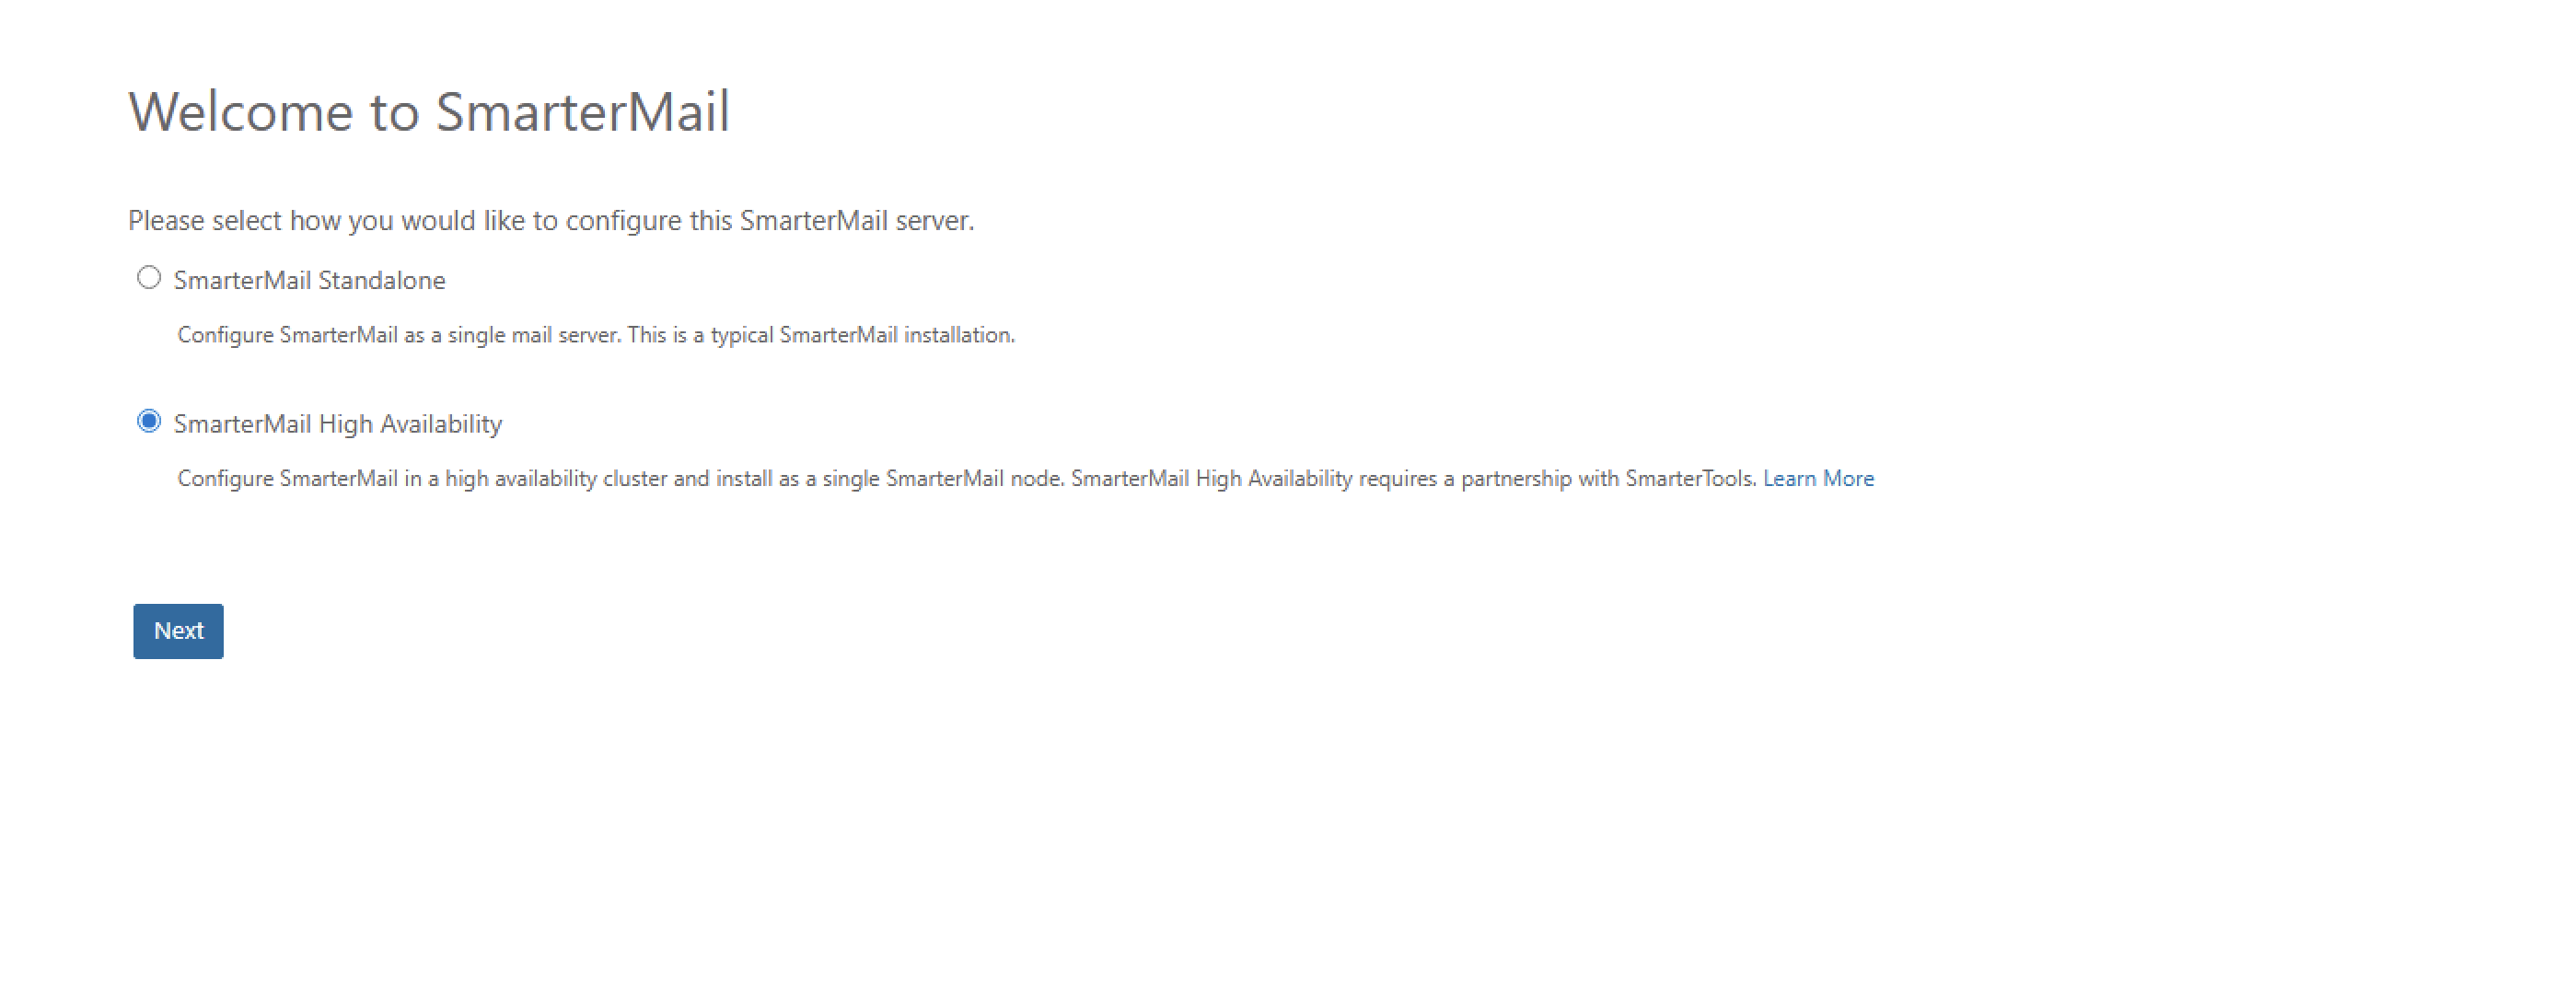
For our purposes, you'll want to select "SmarterMail High Availability" and click Next. You'll then be asked for the location of your hub, along with the same cluster identity values you entered when you set the hub up:
- Hub Hostname - The hostname of the hub this node should enroll against. This is the hostname on its own, not a URL and not a fully qualified name; the node builds the rest from the three values below.
- Cluster Trust Domain - Must match the trust domain configured on the hub. Defaults to "smartermail".
- Cluster Environment - Optional, and must match the hub. If you left it blank on the hub, leave it blank here.
- Cluster DNS Suffix - Must match the DNS suffix configured on the hub.
From those four values the node assembles the hub's address as https://hubhostname.environment.dnssuffix:17003, dropping the environment segment when it's blank, and enrolls over TLS on that port. Three things follow from that, and they account for most failed joins:
- The assembled name has to resolve from the node. If DNS on the node can't resolve it, setup reports a DNS lookup failure.
- Port 17003 has to be reachable on the hub. That's the cluster's join service port. Once a node is a member, ongoing hub and node traffic uses the operational mTLS port, 17993, so both need to be open between cluster members.
- The name has to resolve to a private, locally reachable address. A hub that only resolves to a public address is refused with "Hub must be locally accessible." Nodes enroll across the internal network, not the internet.
Click the Finish button and the node contacts the hub. What happens next depends on how you registered it.
If you registered the node as a standby node, setup is finished here. You'll see a message confirming that the standby node successfully joined the cluster, no further action is needed, and the node restarts into standby to wait for the hub to activate it.
For an active node, the hub returns the node's registered configuration along with its certificate. The node mounts its volume using the Volume Mount Path and mount script you configured, then moves on to one last step: the node's own administrator account.
- Username - The primary administrator for this node. It cannot match any system administrator username that already exists in the cluster, including the cluster administrator's, and the wizard checks the list the hub returns as you type.
- Password / Confirm Password - At least 8 characters, with an uppercase letter, a lowercase letter and a number.
Click Finish and you'll see "Setup Complete." The node restarts and takes you to its login page. Repeat Node Configuration and Node Set Up for each additional node in your cluster.
Paths the Setup Wizard Configures for You
Older releases of SmarterMail HA required a round of post-deployment edits on each node, setting the root mail path, spool, logs and quarantine by hand. That's no longer necessary, and doing it by hand now risks pointing a node somewhere the cluster doesn't expect. The node's setup wizard derives every path from the Volume Mount Path you entered in the node's configuration and writes them during setup. Using a Volume Mount Path of /data/node1/, the node comes out of setup with:
- Root Mail Path - /data/node1/Domains/
- Spool Path - /data/node1/Spool/
- Log File Path - /data/node1/Logs/
- Quarantine Path - /data/node1/Quarantine/
- Archive Path - /data/node1/Archive/
- Certificates Path - /data/node1/Certificates/
- POP Retrieval Path - /data/node1/PopRetrieval/
- IMAP Retrieval Path - /data/node1/ImapRetrieval/
SmarterMail creates a folder inside Domains for each domain that's added to the node, so no additional path work is needed before you start adding domains.
Verifying a Node After Setup
It's still worth confirming the node landed where you expect, and the hub gives you a way in without a separate login.
- Log back in to your hub.
- From the Manage area, click on the Nodes tab.
- Right click on your node and select Manage Node. This logs you in as the system administrator for that node, and you'll see that this is really no different than logging in as a system administrator to any SmarterMail installation. (Manage Node is only available while the node is active.)
- Select Settings from the top menu, then General in the left tree, and confirm the Spool Path, Log Files and Quarantine Path on the Paths card point into the node's share.
- Select Manage from the top menu, then Domain Defaults from the left tree menu, and confirm the Root Mail Path points at the Domains folder inside that share.
These should already be correct. Change them only if you're deliberately relocating a node's storage, and expect to move the existing data along with them.
The same right-click menu on the Nodes tab is where you'll manage a node's life cycle after setup: Enable Failover and Disable Failover change whether the hub may hand this node's volume to a standby, Force Failover triggers that handoff on demand, Restore Idle Node brings an idled node back into service, and Delete removes a node's configuration once it's no longer active.